

Taints와 Tolerations — 노드가 Pod를 밀어내는 메커니즘
NoSchedule/PreferNoSchedule/NoExecute 세 가지 Taint Effect의 동작 차이, Toleration으로 특정 Pod만 허용하는 방법, 쿠버네티스 시스템 Taint, tolerationSeconds 활용을 설명합니다.
지난 글에서 Affinity로 “Pod가 특정 노드를 선택하는” 방향의 제어를 다뤘다. Taint와 Toleration은 방향이 반대다. 노드가 특정 Pod를 거부하는 방식으로 작동한다. 노드에 Taint(오염)를 걸면 그 Taint를 참을 수 있는 Toleration(내성)을 가진 Pod만 스케줄된다. GPU 노드를 GPU 워크로드에만 예약하거나, 마스터 노드에 일반 Pod가 스케줄되지 않도록 하거나, 특수 하드웨어 노드를 전용으로 운영할 때 사용한다.
기본 개념
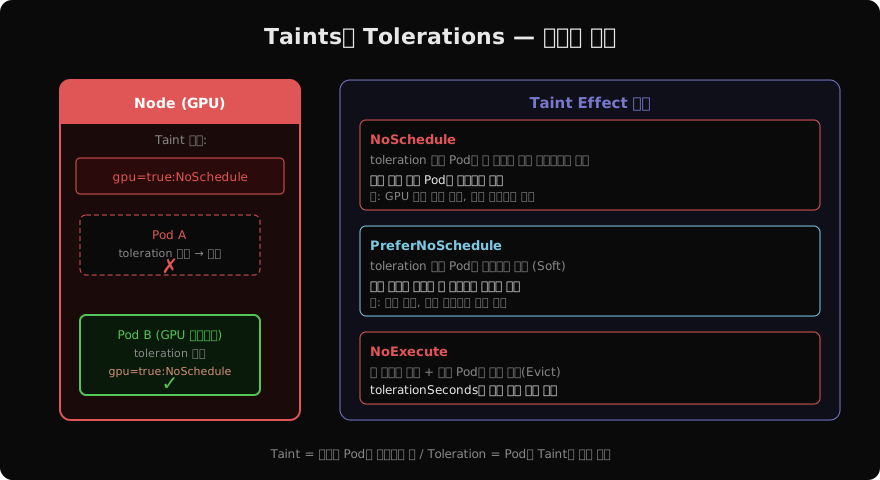
Taint 형식은 key=value:effect다. kubectl taint nodes node-1 gpu=true:NoSchedule처럼 추가한다. Pod에 이 Taint에 대응하는 Toleration이 없으면 해당 노드에 스케줄되지 않는다.
Taint Effect 세 가지
NoSchedule: 새로 들어오는 Pod에만 적용된다. Toleration이 없는 Pod는 이 노드에 스케줄되지 않는다. 이미 노드에서 실행 중인 Pod는 영향받지 않는다. 가장 흔히 사용하는 effect다.
PreferNoSchedule: 소프트 버전이다. 가능하면 이 노드를 피하지만, 다른 적합한 노드가 없으면 Toleration 없는 Pod도 이 노드에 스케줄될 수 있다.
NoExecute: 가장 강력하다. 새 스케줄을 거부하는 것은 물론, 이미 실행 중인 Pod 중 Toleration이 없는 것도 즉시 축출(Evict)한다. tolerationSeconds로 유예 시간을 줄 수 있다.
Taint와 Toleration 설정
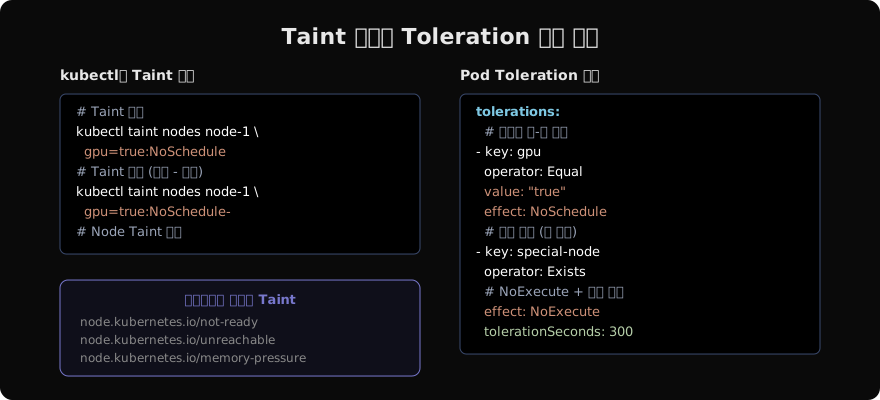
# GPU 노드 전용 예약
kubectl taint nodes gpu-node-1 gpu=true:NoSchedule

# 모든 NoSchedule taint 확인
kubectl describe nodes | grep -A2 "Taints:"

# Taint 제거 (끝에 - 추가)
kubectl taint nodes gpu-node-1 gpu=true:NoSchedule-
Pod Toleration 예시:
spec:
  tolerations:
    - key: gpu
      operator: Equal
      value: "true"
effect: NoScheduleoperator는 Equal(키-값 모두 일치)과 Exists(키만 있으면 됨) 두 가지다. effect를 생략하면 해당 키의 모든 effect를 허용한다.
시스템 Taint 활용
쿠버네티스는 노드 상태 문제가 발생할 때 자동으로 Taint를 추가한다.
| Taint | 추가 조건 |
|---|---|
node.kubernetes.io/not-ready | 노드가 Ready 상태가 아닐 때 |
node.kubernetes.io/unreachable | NodeController가 노드에 접근 불가할 때 |
node.kubernetes.io/memory-pressure | 메모리 압박 상황 |
node.kubernetes.io/disk-pressure | 디스크 압박 상황 |
node.kubernetes.io/unschedulable | kubectl cordon 실행 시 |
DaemonSet Pod들은 기본적으로 not-ready와 unreachable Taint에 대한 Toleration을 자동으로 갖는다. 노드가 문제 상황에서도 DaemonSet 에이전트가 계속 실행될 수 있도록 하기 위해서다.
NoExecute와 tolerationSeconds
노드 장애 상황에서 Pod 축출을 지연시킬 때 tolerationSeconds를 사용한다.
tolerations:
  - key: node.kubernetes.io/not-ready
    operator: Exists
    effect: NoExecute
    tolerationSeconds: 300
  - key: node.kubernetes.io/unreachable
    operator: Exists
    effect: NoExecute
    tolerationSeconds: 300
이 Toleration은 노드가 not-ready/unreachable 상태가 되어도 5분(300초)간 Pod를 축출하지 않는다. 일시적인 네트워크 글리치로 인한 불필요한 재배포를 방지한다. 기본값은 kube-apiserver의 --default-not-ready-toleration-seconds와 --default-unreachable-toleration-seconds로 설정되며, 기본 300초다.
Affinity와 Taint의 조합
GPU 노드를 완전히 전용으로 운영하는 패턴이다.
# 1. Node에 Taint 추가 (일반 Pod 배제)
# kubectl taint nodes gpu-node gpu=true:NoSchedule

# 2. GPU 워크로드 Pod에 Toleration + nodeAffinity 설정
spec:
  tolerations:
    - key: gpu
      operator: Equal
      value: "true"
      effect: NoSchedule
  affinity:
    nodeAffinity:
      requiredDuringSchedulingIgnoredDuringExecution:
        nodeSelectorTerms:
          - matchExpressions:
              - key: gpu
                operator: Exists
Taint만 쓰면 Toleration 있는 Pod가 GPU 노드에 스케줄될 수 있지만, 반드시 GPU 노드에만 가는 것은 보장되지 않는다. Taint(노드에서 밀어내기) + nodeAffinity(원하는 노드로 당기기)를 함께 써야 양방향 제어가 완성된다.
마스터 노드 Taint
kubeadm으로 설치한 클러스터의 마스터 노드에는 node-role.kubernetes.io/control-plane:NoSchedule Taint가 기본으로 설정된다. 이 덕분에 일반 워크로드가 마스터 노드에 배치되지 않는다. 개발용 단일 노드 클러스터에서는 이 Taint를 제거해 마스터에도 Pod를 배치할 수 있다.
# 마스터 Taint 확인
kubectl describe node $(kubectl get nodes -l node-role.kubernetes.io/control-plane= -o name | head -1) | grep Taint

# 개발환경에서 마스터 Taint 제거 (프로덕션 금지!)
kubectl taint nodes <master-node> node-role.kubernetes.io/control-plane:NoSchedule-
지난 글: Node Affinity와 Pod Affinity — 유연한 스케줄링 제어
다음 글: Topology Spread Constraints — Pod 분산 배치 최적화
읽어주셔서 감사합니다. 😊
PALDYN / ARTICLE AI
글의 개념, 수식, 코드에 대해 물어보세요.
질문과 관련된 문단을 골라 답변의 문맥으로 사용합니다.생각 중 · 0초