

Redux Slices 패턴 — 도메인 기반 상태 구조화
Feature-slice 패턴으로 Redux 상태를 도메인별로 구조화하는 방법, Selector 파일 분리, createSelector로 파생 상태 메모이제이션, 여러 Slice를 조합하는 패턴을 설명합니다.
지난 글에서 Redux Toolkit의 핵심 API를 살펴봤다. 실제 프로젝트에서는 여러 개의 Slice를 어떻게 구성하고 조율하느냐가 유지보수성을 크게 좌우한다. 이번 글에서는 도메인 기반 Slice 패턴을 깊이 살펴본다.
Feature-Slice 파일 구조
가장 권장되는 구조는 기능(Feature) 별로 디렉터리를 만들고 그 안에 Slice, Selector, 컴포넌트를 함께 두는 방식이다.
src/
  features/
    auth/
      authSlice.ts      ← reducer + actions + thunks
      authSelectors.ts  ← selector 함수들
      LoginForm.tsx     ← 관련 UI 컴포넌트
      AuthGuard.tsx
    cart/
      cartSlice.ts
      cartSelectors.ts
      CartPage.tsx
      CartItem.tsx
    products/
      productsSlice.ts
      productsSelectors.ts
      ProductList.tsx
  store.ts              ← configureStore
  hooks.ts              ← useAppSelector, useAppDispatch
이 구조의 장점은 관련 코드가 한 곳에 모여 있어 기능 단위로 파악하고 수정하기 쉽다는 것이다.
여러 Slice를 스토어에 조합하기
// store.ts
import { configureStore } from '@reduxjs/toolkit';
import authReducer from './features/auth/authSlice';
import cartReducer from './features/cart/cartSlice';
import productsReducer from './features/products/productsSlice';
import uiReducer from './features/ui/uiSlice';

export const store = configureStore({
  reducer: {
    auth: authReducer,
    cart: cartReducer,
    products: productsReducer,
    ui: uiReducer,
  },
});

export type RootState = ReturnType<typeof store.getState>;
export type AppDispatch = typeof store.dispatch;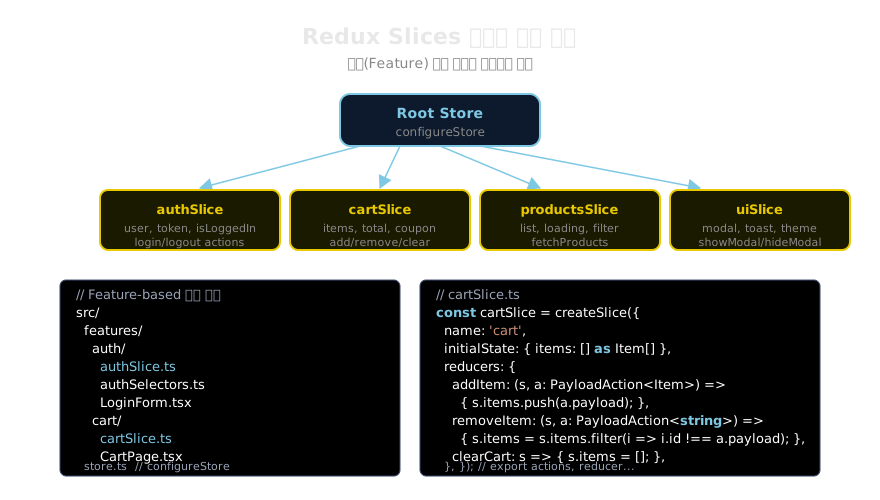
실전 Slice — 인증(Auth) 예제
// features/auth/authSlice.ts
import { createSlice, createAsyncThunk, PayloadAction } from '@reduxjs/toolkit';

interface User {
  id: string;
  name: string;
  email: string;
}

interface AuthState {
  user: User | null;
  token: string | null;
  loading: boolean;
  error: string | null;
}

// 비동기 thunk
export const login = createAsyncThunk(
  'auth/login',
  async (credentials: { email: string; password: string }, { rejectWithValue }) => {
    try {
      const response = await fetch('/api/auth/login', {
        method: 'POST',
        body: JSON.stringify(credentials),
        headers: { 'Content-Type': 'application/json' },
      });
      if (!response.ok) return rejectWithValue('로그인에 실패했습니다');
      return await response.json() as { user: User; token: string };
    } catch {
      return rejectWithValue('네트워크 오류가 발생했습니다');
    }
  }
);

const authSlice = createSlice({
  name: 'auth',
  initialState: {
    user: null,
    token: localStorage.getItem('token'),
    loading: false,
    error: null,
  } as AuthState,
  reducers: {
    logout(state) {
      state.user = null;
      state.token = null;
      localStorage.removeItem('token');
    },
    clearError(state) {
      state.error = null;
    },
  },
  extraReducers: (builder) => {
    builder
      .addCase(login.pending, (state) => {
        state.loading = true;
        state.error = null;
      })
      .addCase(login.fulfilled, (state, action) => {
        state.loading = false;
        state.user = action.payload.user;
        state.token = action.payload.token;
        localStorage.setItem('token', action.payload.token);
      })
      .addCase(login.rejected, (state, action) => {
        state.loading = false;
        state.error = action.payload as string;
      });
  },
});

export const { logout, clearError } = authSlice.actions;
export default authSlice.reducer;
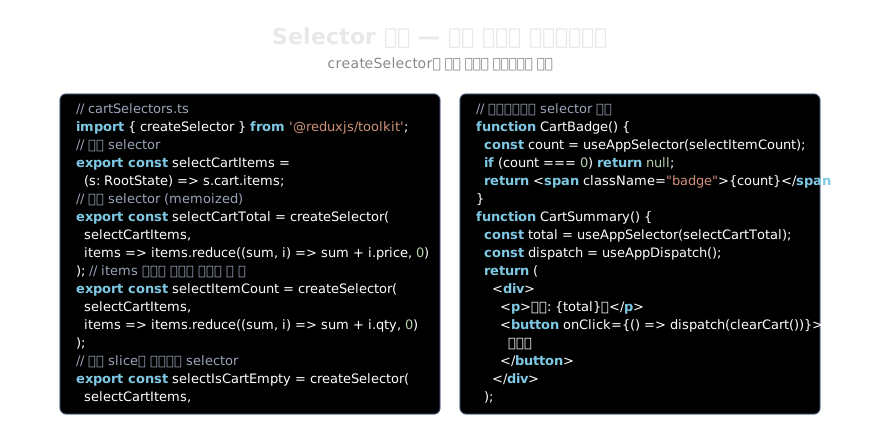
Selector 파일 분리와 createSelector
Selector는 별도 파일로 분리해 재사용성을 높이는 것이 좋다.
// features/cart/cartSelectors.ts
import { createSelector } from '@reduxjs/toolkit';
import type { RootState } from '../../store';

// 기본 selector
export const selectCartItems = (state: RootState) => state.cart.items;
export const selectCoupon = (state: RootState) => state.cart.coupon;

// 파생 selector — createSelector로 메모이제이션
export const selectCartSubtotal = createSelector(
  selectCartItems,
  (items) => items.reduce((sum, item) => sum + item.price * item.quantity, 0)
);

export const selectCartItemCount = createSelector(
  selectCartItems,
  (items) => items.reduce((sum, item) => sum + item.quantity, 0)
);

export const selectCartTotal = createSelector(
  selectCartSubtotal,
  selectCoupon,
  (subtotal, coupon) => {
    if (!coupon) return subtotal;
    if (coupon.type === 'percent') return subtotal * (1 - coupon.discount / 100);
    return subtotal - coupon.discount;
  }
);
여러 Slice를 조합하는 Selector
한 Selector가 여러 Slice의 데이터를 조합해야 할 때도 createSelector를 사용한다.
// 교차 도메인 selector: 로그인 사용자의 장바구니 요약
import { selectUser } from '../auth/authSelectors';
import { selectCartItems, selectCartTotal } from '../cart/cartSelectors';

export const selectCheckoutSummary = createSelector(
  selectUser,
  selectCartItems,
  selectCartTotal,
  (user, items, total) => ({
    userEmail: user?.email ?? '',
    itemCount: items.length,
    total,
    isReady: !!user && items.length > 0,
  })
);

// 컴포넌트
function CheckoutButton() {
  const summary = useAppSelector(selectCheckoutSummary);

  if (!summary.isReady) return null;
  return (
    <button>
      {summary.itemCount}개 항목 결제 ({summary.total.toLocaleString()}원)
    </button>
  );
}
Slice 간 액션 처리 — extraReducers
한 Slice의 액션이 다른 Slice에 영향을 줄 때 extraReducers를 사용한다.
// cartSlice: 로그아웃 시 장바구니 비우기
import { logout } from '../auth/authSlice';

const cartSlice = createSlice({
  name: 'cart',
  initialState: { items: [] as CartItem[] },
  reducers: {
    addItem: (state, action: PayloadAction<CartItem>) => {
      state.items.push(action.payload);
    },
    removeItem: (state, action: PayloadAction<string>) => {
      state.items = state.items.filter(i => i.id !== action.payload);
    },
  },
  extraReducers: (builder) => {
    // auth의 logout 액션에 반응
    builder.addCase(logout, (state) => {
      state.items = []; // 로그아웃 시 장바구니 초기화
    });
  },
});
이렇게 하면 cartSlice가 authSlice를 직접 수정하지 않으면서도 도메인 간 연동이 가능하다.
Redux Toolkit의 Slice 패턴은 대규모 팀에서 상태를 체계적으로 관리하는 강력한 방법이다. 이어지는 글에서는 RTK Query로 서버 상태까지 Redux 안으로 통합하는 방법을 다룬다.
지난 글: Redux Toolkit 완전 가이드 — createSlice와 configureStore
다음 글: RTK Query — Redux에서 서버 상태 관리하기
읽어주셔서 감사합니다. 😊
PALDYN / ARTICLE AI
글의 개념, 수식, 코드에 대해 물어보세요.
질문과 관련된 문단을 골라 답변의 문맥으로 사용합니다.생각 중 · 0초