

user-event — 실제 사용자처럼 상호작용 테스트하기
@testing-library/user-event로 클릭, 타이핑, 키보드 내비게이션, 선택, 클립보드 동작을 테스트하는 방법을 다룹니다. fireEvent와의 차이, setup 패턴, 주요 API와 키보드 접근성 테스트까지 설명합니다.
지난 글에서 요소를 찾는 쿼리를 정리했다. 찾은 요소와 상호작용하는 도구가 이번 주제다. Testing Library에는 이벤트를 일으키는 방법이 두 가지 있다. 저수준의 fireEvent와 고수준의 @testing-library/user-event. 결론부터 말하면 거의 모든 경우 user-event를 써야 하며, 그 이유는 두 도구가 시뮬레이션하는 충실도의 차이에 있다.
fireEvent와 무엇이 다른가
fireEvent.click은 DOM에 click 이벤트 객체 하나를 디스패치할 뿐이다. 하지만 실제 브라우저에서 사용자가 버튼을 클릭하면 훨씬 많은 일이 일어난다.
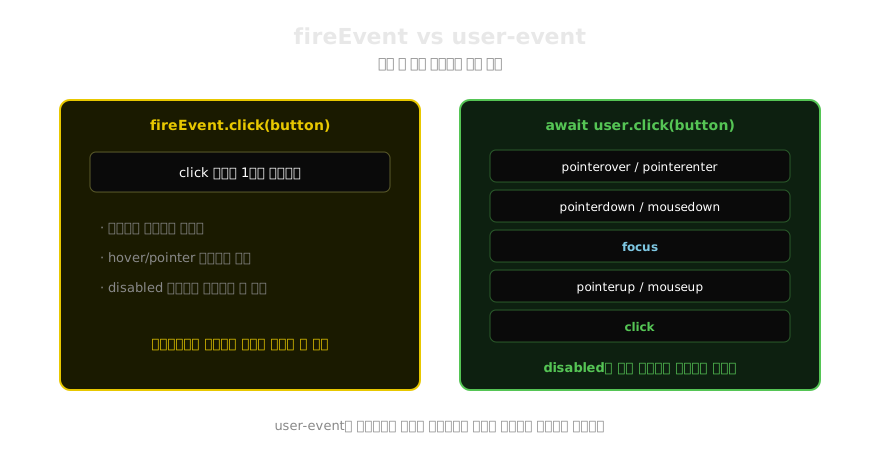
user-event는 pointer 이벤트부터 포커스 이동까지 브라우저의 실제 이벤트 시퀀스를 순서대로 재현한다. 이 차이가 실질적인 버그 검출력 차이로 이어진다.
fireEvent.click은 disabled 버튼에도 이벤트를 발생시킬 수 있다. 실제로는 불가능한 동작이 테스트에서 통과해 버린다. user-event는 브라우저처럼 아무 일도 일으키지 않는다- hover 시에만 나타나는 툴팁, 포커스 스타일 같은 동작은 fireEvent로 제대로 테스트할 수 없다
- mousedown 핸들러에서
preventDefault를 호출하면 user-event는 브라우저처럼 후속 동작을 중단한다
setup 패턴 — 항상 이렇게 시작한다
v14부터 권장되는 사용법은 userEvent.setup()으로 세션을 만들고, 모든 API를 await하는 것이다.
import userEvent from '@testing-library/user-event';
import { render, screen } from '@testing-library/react';

test('할 일을 추가한다', async () => {
  const user = userEvent.setup();   // render보다 먼저 호출
  render(<TodoApp />);

  await user.type(screen.getByRole('textbox', { name: '할 일' }), '우유 사기');
  await user.click(screen.getByRole('button', { name: '추가' }));

  expect(screen.getByRole('listitem')).toHaveTextContent('우유 사기');
});setup이 반환하는 인스턴스는 마우스 위치, 누르고 있는 키 같은 입력 장치 상태를 테스트 내내 유지한다. Shift를 누른 채 클릭하는 시나리오가 자연스럽게 표현되는 이유다.
타이핑 — type, clear, keyboard
user.type은 한 글자씩 실제 키 이벤트를 발생시킨다.
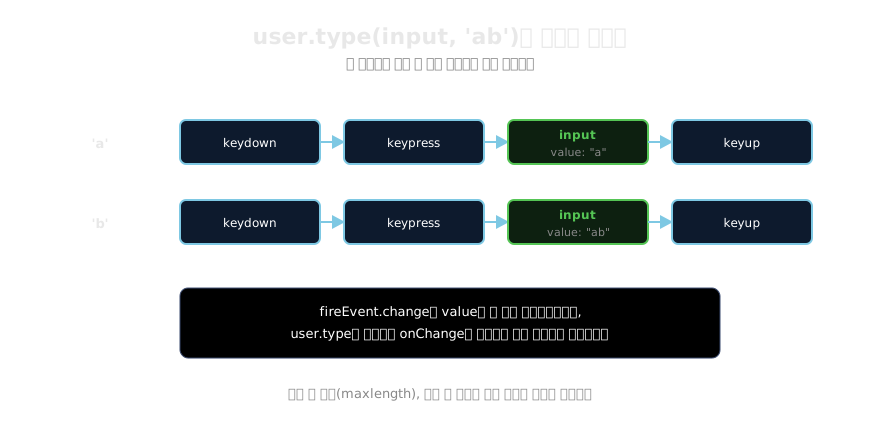
글자마다 onChange가 호출되므로, 입력 중 실시간 검증이나 자동 포맷팅(전화번호 하이픈 등) 로직이 그대로 테스트된다. fireEvent.change로 value를 한 번에 바꿔치기하면 이런 로직은 검증되지 않는다.
const input = screen.getByRole('textbox', { name: '전화번호' });

await user.type(input, '01012345678');
expect(input).toHaveValue('010-1234-5678');   // 포맷팅 로직 검증

// 기존 값 지우고 다시 입력
await user.clear(input);
await user.type(input, '021234567');

// 특수 키는 중괄호 문법
await user.type(input, 'foo{enter}');
await user.keyboard('{Control>}a{/Control}');  // Ctrl 누른 채 a
키보드 내비게이션 — tab
접근성 관점에서 중요한 테스트가 키보드만으로 UI를 조작할 수 있는지다.
test('Tab 키로 폼을 순회할 수 있다', async () => {
  const user = userEvent.setup();
  render(<LoginForm />);

  await user.tab();
  expect(screen.getByLabelText('이메일')).toHaveFocus();

  await user.tab();
  expect(screen.getByLabelText('비밀번호')).toHaveFocus();

  await user.tab();
  expect(screen.getByRole('button', { name: '로그인' })).toHaveFocus();

  // 포커스된 버튼을 Enter로 실행
  await user.keyboard('{Enter}');
});
모달이 열렸을 때 포커스가 갇히는지(focus trap), Escape로 닫히는지 같은 시나리오도 같은 방식으로 검증한다.
선택 요소들 — selectOptions, upload
// <select> 옵션 선택
await user.selectOptions(
  screen.getByRole('combobox', { name: '카테고리' }),
  'React'
);
expect(
  (screen.getByRole('option', { name: 'React' }) as HTMLOptionElement).selected
).toBe(true);

// 체크박스·라디오
await user.click(screen.getByRole('checkbox', { name: '약관 동의' }));

// 파일 업로드
const file = new File(['hello'], 'hello.png', { type: 'image/png' });
const fileInput = screen.getByLabelText('프로필 이미지');
await user.upload(fileInput, file);
expect((fileInput as HTMLInputElement).files![0]).toBe(file);
클립보드와 포인터
// 복사 / 붙여넣기
await user.click(input);
await user.paste('붙여넣은 텍스트');

// hover — 툴팁 테스트
await user.hover(screen.getByRole('button', { name: '삭제' }));
expect(await screen.findByRole('tooltip')).toHaveTextContent('되돌릴 수 없습니다');

await user.unhover(screen.getByRole('button', { name: '삭제' }));
expect(screen.queryByRole('tooltip')).not.toBeInTheDocument();

// 더블클릭, 우클릭
await user.dblClick(item);
await user.pointer({ keys: '[MouseRight]', target: item });
fireEvent가 여전히 필요한 곳
user-event는 사용자가 직접 일으킬 수 있는 동작만 제공한다. 사용자 동작이 아닌 이벤트는 fireEvent로 발생시킨다.
import { fireEvent } from '@testing-library/react';

// scroll은 user-event에 없다 — 직접 발생시켜야 한다
fireEvent.scroll(window, { target: { scrollY: 500 } });

// 외부 요인으로 발생하는 이벤트들
fireEvent.error(screen.getByRole('img'));        // 이미지 로드 실패
fireEvent.transitionEnd(modal);                  // CSS 트랜지션 종료
기준은 간단하다. 사람 손으로 일으킬 수 있으면 user-event, 브라우저나 환경이 일으키는 이벤트면 fireEvent다.
상호작용까지 재현했으니 남은 큰 조각은 네트워크다. 컴포넌트가 fetch하는 API를 테스트에서 어떻게 다룰 것인가? 다음 글에서는 네트워크 레벨에서 요청을 가로채는 MSW(Mock Service Worker)를 다룬다.
지난 글: Testing Library 쿼리 완전 정리 — getBy, queryBy, findBy
다음 글: MSW로 API 모킹하기 — 네트워크 레벨 테스트
읽어주셔서 감사합니다. 😊
PALDYN / ARTICLE AI
글의 개념, 수식, 코드에 대해 물어보세요.
질문과 관련된 문단을 골라 답변의 문맥으로 사용합니다.생각 중 · 0초