

인증서와 신뢰 체인: PKI와 CA의 동작 원리
X.509 인증서 구조, Root CA·Intermediate CA·Leaf 인증서 신뢰 체인, 인증서 검증 4단계, OCSP·CRL 폐기 확인, Certificate Transparency 로그를 다룹니다.
지난 글에서 디지털 서명의 동작 원리를 살펴봤다. 이번 글에서는 인터넷 보안의 근간인 PKI(Public Key Infrastructure)와 X.509 인증서가 어떻게 신뢰를 구축하는지 다룬다.
신뢰의 문제
공개키 암호화로 통신을 암호화하더라도 한 가지 문제가 남는다: “내가 교환하는 공개키가 정말 example.com의 것인가?” 공격자가 중간에서 자신의 공개키를 삽입하면 어떻게 알아챌 수 있을까?
PKI는 신뢰할 수 있는 제3자(CA)를 통해 이 문제를 해결한다. CA가 “이 공개키는 정말 example.com의 것”이라고 디지털 서명으로 보증한다.
X.509 인증서 구조
# 인증서 내용 확인
openssl x509 -in cert.pem -text -noout

# 주요 필드 출력 예시:
# Version: 3
# Serial Number: 0a:1b:2c:...
# Signature Algorithm: ecdsa-with-SHA256
# Issuer: C=US, O=DigiCert Inc, CN=DigiCert TLS RSA SHA256 2020 CA1
# Validity:
#     Not Before: Jan 1 00:00:00 2026 GMT
#     Not After : Feb 1 23:59:59 2027 GMT
# Subject: CN=www.example.com
# Subject Public Key Info:
#     Public Key Algorithm: id-ecPublicKey
# X509v3 extensions:
#     Subject Alternative Name: DNS:example.com, DNS:*.example.com
#     Authority Information Access:
#         OCSP - URI:http://ocsp.digicert.com
#     X509v3 CRL Distribution Points: ...
#     CT Precertificate SCTs: ...
핵심 필드를 이해하면 인증서 관련 오류를 직접 진단할 수 있다.
| 필드 | 의미 | 주의사항 |
|---|---|---|
| Subject CN | 인증서 소유 도메인 | 현재 SAN으로 대체, CN만으로는 부족 |
| SAN | 실제 검증에 사용되는 도메인 목록 | 와일드카드 *.example.com 포함 가능 |
| Validity | 유효 기간 | 최대 398일(13개월) 제한 (2020년 이후) |
| Issuer | 서명한 CA | 체인 검증에 사용 |
| OCSP URI | 폐기 상태 확인 엔드포인트 | 클라이언트가 실시간 조회 |
| SCT | CT 로그 타임스탬프 | Chrome: 2개 이상 필수 |
신뢰 체인: Root CA부터 Leaf까지
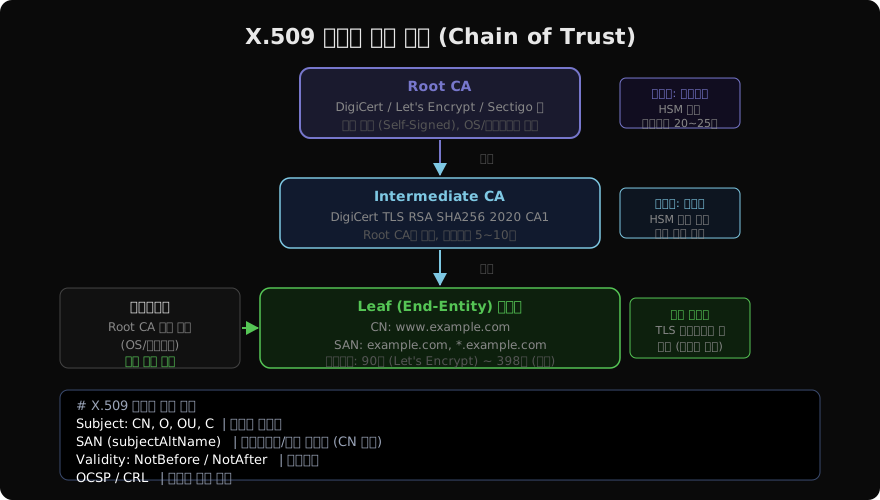
Root CA
Root CA는 자체 서명(self-signed) 인증서를 갖는다 — 스스로를 신뢰한다. 이 인증서들은 OS와 브라우저에 미리 내장되어 있다. 브라우저나 OS를 신뢰하는 것이 PKI 신뢰의 출발점이다.
# macOS에 내장된 Root CA 목록 확인
security find-certificate -a -c "Root" /System/Library/Keychains/SystemRootCertificates.keychain

# Firefox: 자체 Root CA 저장소 사용 (OS와 별개)
# Chrome/Safari: OS 저장소 사용
Root CA의 비밀키는 극도로 보호된다. 물리적으로 격리된 HSM(Hardware Security Module)에 보관하고, 서명 작업 시에는 복잡한 물리적 접근 절차를 거친다.
Intermediate CA
Root CA는 직접 Leaf 인증서를 발급하지 않는다. 그 사이에 Intermediate CA(중간 CA)가 존재한다. 이유는 보안과 운영 효율성이다:
- Root CA 비밀키를 오프라인으로 보관 가능 (노출 위험 최소화)
- Intermediate CA가 침해되면 Root CA가 해당 Intermediate를 폐기하고 재발급
# Python으로 인증서 체인 검증
from cryptography import x509
from cryptography.hazmat.primitives import hashes
from cryptography.x509 import load_pem_x509_certificate
import requests

def verify_cert_chain(leaf_pem: bytes, intermediate_pem: bytes, root_pem: bytes) -> bool:
    """기본적인 체인 검증 (실제로는 OpenSSL 사용)"""
    leaf = load_pem_x509_certificate(leaf_pem)
    intermediate = load_pem_x509_certificate(intermediate_pem)
    root = load_pem_x509_certificate(root_pem)

    # Issuer/Subject 체인 확인
    assert leaf.issuer == intermediate.subject
    assert intermediate.issuer == root.subject
    assert root.issuer == root.subject  # Root는 자체 서명

    # 서명 검증 (단순화)
    try:
        intermediate.public_key().verify(
            leaf.signature,
            leaf.tbs_certificate_bytes,
            leaf.signature_hash_algorithm
        )
        return True
    except Exception:
        return False
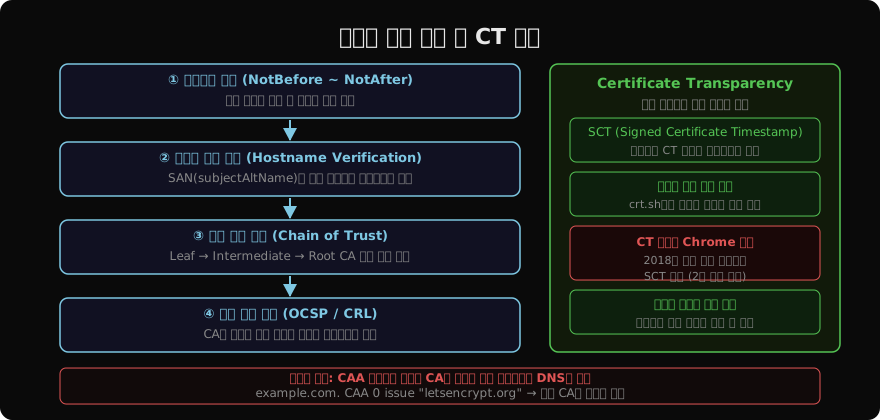
인증서 검증 4단계
import ssl
import socket
import datetime

def check_certificate(hostname: str, port: int = 443) -> dict:
    """TLS 연결로 인증서 정보 확인"""
    context = ssl.create_default_context()
    with socket.create_connection((hostname, port)) as sock:
        with context.wrap_socket(sock, server_hostname=hostname) as ssock:
            cert = ssock.getpeercert()

    # 유효기간 확인
    not_after = datetime.datetime.strptime(
        cert['notAfter'], '%b %d %H:%M:%S %Y %Z'
    )
    days_left = (not_after - datetime.datetime.utcnow()).days

    # SAN 확인
    san = [v for _, v in cert.get('subjectAltName', [])]

    return {
        "subject": dict(x[0] for x in cert['subject']),
        "issuer": dict(x[0] for x in cert['issuer']),
        "expires": not_after.isoformat(),
        "days_remaining": days_left,
        "san": san,
        "version": cert.get('version')
    }

info = check_certificate("example.com")
print(f"만료까지 {info['days_remaining']}일, SAN: {info['san']}")
OCSP Stapling
기본 OCSP는 클라이언트가 매 연결마다 CA에 HTTP 요청을 보내야 한다. 이는 성능 저하와 프라이버시 문제를 야기한다. OCSP Stapling은 서버가 미리 CA로부터 OCSP 응답을 받아 TLS 핸드셰이크에 포함시킨다.
# nginx OCSP Stapling 설정
ssl_stapling on;
ssl_stapling_verify on;
resolver 8.8.8.8 valid=300s;
ssl_trusted_certificate /path/to/chain.pem;
인증서 발급 및 관리
# Let's Encrypt로 무료 인증서 발급 (certbot)
certbot certonly --nginx -d example.com -d www.example.com

# 인증서 자동 갱신 설정 (cron)
echo "0 12 * * * root certbot renew --quiet" >> /etc/crontab

# CAA DNS 레코드 설정 (오발급 방지)
# example.com CAA 0 issue "letsencrypt.org"
# example.com CAA 0 issuewild ";"  # 와일드카드 발급 금지

# 인증서 만료일 모니터링
openssl s_client -connect example.com:443 -servername example.com \
  < /dev/null 2>/dev/null | openssl x509 -noout -enddate

# CT 로그에서 도메인 인증서 조회 (오발급 탐지)
# crt.sh?q=example.com
흔한 인증서 오류와 해결
import ssl
import urllib.request

# ERR_CERT_DATE_INVALID: 만료 또는 시계 오류
try:
    urllib.request.urlopen("https://expired.example.com")
except ssl.SSLCertVerificationError as e:
    print(f"인증서 오류: {e}")

# 개발 환경에서 자체 서명 인증서 허용 (프로덕션 절대 금지)
context = ssl.create_default_context()
context.check_hostname = False   # ❌ 프로덕션 금지
context.verify_mode = ssl.CERT_NONE  # ❌ 프로덕션 절대 금지

# ✅ 프로덕션: 커스텀 CA 번들 추가
context = ssl.create_default_context(cafile="/path/to/ca-bundle.pem")| 오류 | 원인 | 해결 |
|---|---|---|
NET::ERR_CERT_DATE_INVALID | 만료 또는 시계 불일치 | 인증서 갱신, 시스템 시계 동기화 |
NET::ERR_CERT_AUTHORITY_INVALID | 신뢰할 수 없는 CA | 올바른 CA 인증서 설치, 체인 완성 |
NET::ERR_CERT_COMMON_NAME_INVALID | 도메인 불일치 | SAN 필드 확인 및 재발급 |
INCOMPLETE_CHAIN | Intermediate CA 누락 | nginx에 전체 체인 파일 제공 |
지난 글: 디지털 서명: RSA-PSS·ECDSA·Ed25519 비교
다음 글: CSPRNG: 암호학적으로 안전한 난수 생성
읽어주셔서 감사합니다. 😊
PALDYN / ARTICLE AI
글의 개념, 수식, 코드에 대해 물어보세요.
질문과 관련된 문단을 골라 답변의 문맥으로 사용합니다.생각 중 · 0초