

저장 데이터·전송 데이터 암호화: 레이어별 전략과 구현
전송 중 암호화(TLS, mTLS)와 저장 데이터 암호화(디스크·DB·앱 레벨)의 차이, AES-GCM 필드 레벨 암호화 구현, Nonce 재사용 금지, 클라우드 KMS 연동을 다룹니다.
지난 글에서 암호학적으로 안전한 난수 생성기를 살펴봤다. 이번 글에서는 데이터 보호의 두 핵심 축인 전송 중 암호화(Encryption in Transit)와 저장 데이터 암호화(Encryption at Rest)를 다룬다.
두 가지 암호화가 모두 필요한 이유
“HTTPS를 쓰면 안전하지 않나?” — 부분적으로만 맞다. TLS는 네트워크 전송 구간만 보호한다. 데이터가 서버에 도착해 DB에 평문으로 저장되면, DB가 유출됐을 때 모든 데이터가 노출된다.
데이터 흐름:
클라이언트 → [TLS 암호화] → 서버 → [평문] → DB
               ✅ 보호         ⚠ 노출 가능
반대로 저장 암호화만 하고 HTTP를 사용하면 네트워크 도청에 노출된다. 두 레이어를 모두 갖춰야 한다.
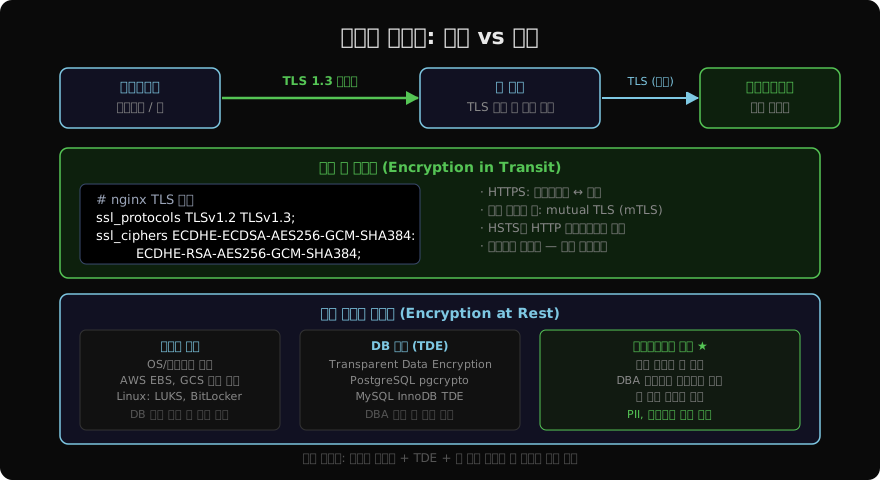
전송 중 암호화 (Encryption in Transit)
HTTPS/TLS 1.3 설정
# nginx TLS 1.3 권장 설정
server {
    listen 443 ssl http2;
    server_name example.com;

    ssl_certificate /etc/ssl/certs/example.com.pem;
    ssl_certificate_key /etc/ssl/private/example.com.key;

    # TLS 1.2 + 1.3 (1.3만 허용하면 호환성 문제 가능)
    ssl_protocols TLSv1.2 TLSv1.3;

    # 취약한 cipher suite 제외 (TLS 1.2용, 1.3은 자동 선택)
    ssl_ciphers ECDHE-ECDSA-AES256-GCM-SHA384:ECDHE-RSA-AES256-GCM-SHA384;
    ssl_prefer_server_ciphers off;  # TLS 1.3에서 off 권장

    # OCSP Stapling
    ssl_stapling on;
    ssl_stapling_verify on;

    # HSTS: HTTPS 강제 (max-age=1년 + subdomains + preload)
    add_header Strict-Transport-Security "max-age=31536000; includeSubDomains; preload" always;

    # ECDHE 임시 키 (PFS 보장)
    ssl_ecdh_curve X25519:P-256;
}
내부 서비스 간 mTLS
마이크로서비스 아키텍처에서는 서비스 간 통신도 암호화해야 한다. mTLS는 서버뿐 아니라 클라이언트도 인증서로 인증한다.
import ssl
import urllib.request

# mTLS 클라이언트 설정
context = ssl.SSLContext(ssl.PROTOCOL_TLS_CLIENT)
context.load_cert_chain(
    certfile='/etc/certs/client.crt',  # 클라이언트 인증서
    keyfile='/etc/certs/client.key'    # 클라이언트 비밀키
)
context.load_verify_locations('/etc/certs/ca.crt')  # 서버 CA 검증
context.verify_mode = ssl.CERT_REQUIRED

# 요청
with urllib.request.urlopen(
    'https://internal-service:8443/api/data',
    context=context
) as response:
    data = response.read()
저장 데이터 암호화 레이어
디스크 레벨 암호화
# Linux LUKS (Disk 전체 암호화)
cryptsetup luksFormat /dev/sdb       # 디스크 암호화 초기화
cryptsetup open /dev/sdb encrypted   # 마운트
mkfs.ext4 /dev/mapper/encrypted
mount /dev/mapper/encrypted /data

# AWS EBS 암호화 (기본값으로 활성화 권장)
aws ec2 enable-ebs-encryption-by-default --region us-east-1
디스크 레벨 암호화는 물리 디스크 분실/도난으로부터 보호하지만, OS가 실행 중인 상태에서 DB 서버에 접근하면 평문이 노출된다.
DB 레벨 암호화 (TDE)
-- PostgreSQL pgcrypto 확장
CREATE EXTENSION pgcrypto;

-- AES-256-CBC로 컬럼 암호화
INSERT INTO users (name, ssn_encrypted)
VALUES (
    'Alice',
    pgp_sym_encrypt('901010-1234567', 'encryption_key')
);

-- 복호화
SELECT pgp_sym_decrypt(ssn_encrypted::bytea, 'encryption_key')
FROM users WHERE name = 'Alice';
하지만 TDE는 DB 레벨에서 투명하게 동작하므로 DBA가 SELECT로 접근하면 평문이 보인다.
애플리케이션 레벨 암호화 (권장)
PII(개인식별정보), 카드번호, 의료기록 같은 민감 데이터는 애플리케이션이 암호화한 후 DB에 저장해야 한다. DBA도 암호문만 볼 수 있다.
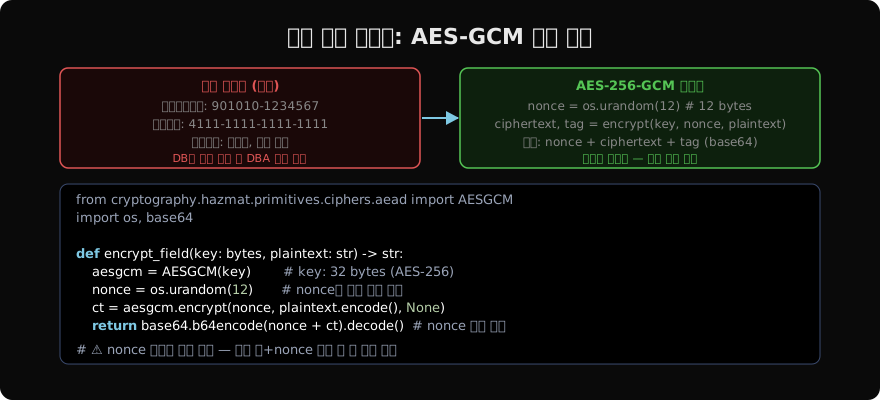
from cryptography.hazmat.primitives.ciphers.aead import AESGCM
import os
import base64

class FieldEncryptor:
    """AES-256-GCM 필드 레벨 암호화"""

    def __init__(self, key: bytes):
        assert len(key) == 32, "AES-256은 32바이트 키 필요"
        self.key = key

    def encrypt(self, plaintext: str, associated_data: bytes = None) -> str:
        """암호화 — nonce를 암호문 앞에 붙여 저장"""
        aesgcm = AESGCM(self.key)
        nonce = os.urandom(12)  # 96 bit nonce (GCM 권장)
        ct = aesgcm.encrypt(nonce, plaintext.encode('utf-8'), associated_data)
        # 저장 형식: base64(nonce + ciphertext + tag)
        return base64.b64encode(nonce + ct).decode()

    def decrypt(self, stored: str, associated_data: bytes = None) -> str:
        """복호화 — nonce 분리 후 복호화"""
        raw = base64.b64decode(stored)
        nonce, ct = raw[:12], raw[12:]
        aesgcm = AESGCM(self.key)
        plaintext = aesgcm.decrypt(nonce, ct, associated_data)
        return plaintext.decode('utf-8')

# 사용 예
key = os.urandom(32)  # 실제론 KMS에서 조회
enc = FieldEncryptor(key)

# 민감 데이터 저장
ssn = "901010-1234567"
encrypted = enc.encrypt(ssn, associated_data=b"user:123")  # AAD로 user ID 바인딩
print(f"DB 저장값: {encrypted}")

# 복원
decrypted = enc.decrypt(encrypted, associated_data=b"user:123")
print(f"복원값: {decrypted}")
Nonce 재사용 절대 금지
AES-GCM에서 같은 (key, nonce) 쌍을 두 번 사용하면 암호화 키가 유추될 수 있다.
# ❌ 위험: nonce 고정 또는 카운터로 재사용
nonce = b'\x00' * 12  # 고정 nonce
nonce = struct.pack('>I', counter)  # 카운터 — counter 재시작 시 충돌

# ✅ 올바른 방법: 매번 랜덤 12 bytes
nonce = os.urandom(12)  # 2^96 공간 — 충돌 확률 무시 가능

# 대용량 처리 (1억 건 이상): nonce 관리 전략 필요
# 옵션 1: os.urandom(12) — 생일 역설로 ~2^48회 후 충돌 가능성
# 옵션 2: 카운터 + 랜덤 결합, 또는 AES-SIV 사용
클라우드 KMS 연동
import boto3

def encrypt_with_kms(plaintext: str, key_id: str) -> dict:
    """AWS KMS Envelope Encryption"""
    kms = boto3.client('kms', region_name='ap-northeast-2')

    # 1. KMS에서 데이터 키 생성
    response = kms.generate_data_key(
        KeyId=key_id,
        KeySpec='AES_256'
    )
    plaintext_key = response['Plaintext']      # 암호화에 사용 후 메모리에서 삭제
    encrypted_key = response['CiphertextBlob'] # DB에 저장

    # 2. 로컬 AES-GCM으로 암호화
    enc = FieldEncryptor(plaintext_key)
    ciphertext = enc.encrypt(plaintext)

    # 메모리에서 평문 키 삭제 (Python GC 한계 — 보완책 필요)
    del plaintext_key

    return {
        "encrypted_key": encrypted_key,  # DB 저장
        "ciphertext": ciphertext          # DB 저장
    }

def decrypt_with_kms(stored: dict) -> str:
    kms = boto3.client('kms', region_name='ap-northeast-2')

    # 1. KMS에서 데이터 키 복호화
    response = kms.decrypt(CiphertextBlob=stored['encrypted_key'])
    plaintext_key = response['Plaintext']

    # 2. 로컬 복호화
    enc = FieldEncryptor(plaintext_key)
    return enc.decrypt(stored['ciphertext'])
Envelope Encryption 패턴의 장점: KMS에는 데이터 키의 암호문만 저장하고, 실제 대용량 데이터 암호화는 로컬 AES로 처리한다. 키 순환 시 새 데이터 키로 재암호화만 하면 된다.
체크리스트
# 전송 중 암호화 점검
curl -I https://example.com | grep -E "Strict-Transport|X-Content"
sslyze --regular example.com  # TLS 설정 상세 분석

# 인증서 만료 모니터링
echo | openssl s_client -connect example.com:443 2>/dev/null \
  | openssl x509 -noout -enddate

# 저장 암호화 점검 (DB 컬럼 확인)
# - 주민번호, 카드번호, 비밀번호(해시), 토큰 등이 평문인지 확인
# - 개인정보보호법: PII는 암호화 또는 의사난수화 필수
지난 글: CSPRNG: 암호학적으로 안전한 난수 생성
다음 글: 키 관리와 순환: 암호화 키 생명주기
읽어주셔서 감사합니다. 😊
PALDYN / ARTICLE AI
글의 개념, 수식, 코드에 대해 물어보세요.
질문과 관련된 문단을 골라 답변의 문맥으로 사용합니다.생각 중 · 0초