

Rate Limiting: API와 웹 서비스 속도 제한 구현
Fixed Window, Sliding Window, Token Bucket, Leaky Bucket 알고리즘 비교와 Redis 구현, FastAPI/Django/Express 미들웨어, IP·사용자·API Key 기반 전략을 다룹니다.
지난 글에서 DDoS 완화 전략을 살펴봤다. 이번 글은 Rate Limiting의 알고리즘 원리와 실제 구현 방법을 다룬다. Rate Limiting은 DDoS 방어뿐 아니라 API 남용 방지, 자원 공정 분배, 크리덴셜 스터핑 방어에도 핵심이다.
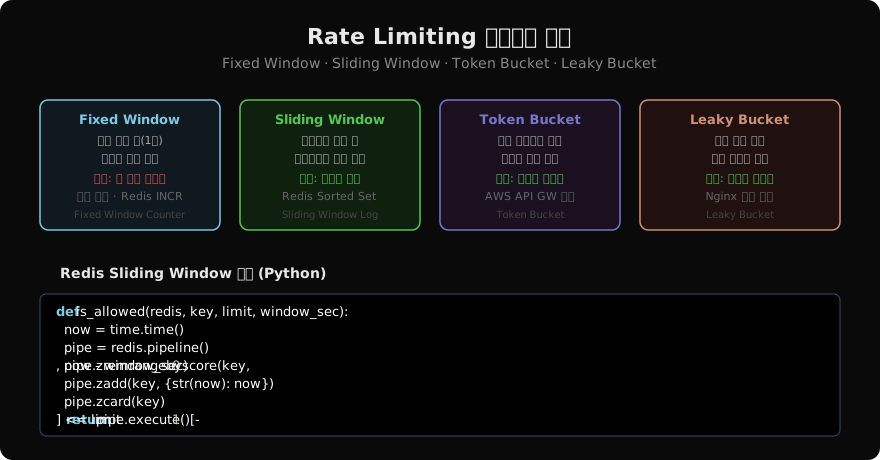
알고리즘 선택 기준
Fixed Window: 구현이 가장 간단하고 Redis INCR + EXPIRE 한 줄로 구현된다. 단, 창 경계(59초~61초)에 제한의 2배까지 요청이 가능한 버스트 문제가 있다.
Sliding Window Log: 타임스탬프 목록을 Redis Sorted Set에 유지해 정확한 슬라이딩 창을 구현한다. 가장 정확하지만 메모리를 많이 사용한다.
Sliding Window Counter: Fixed Window의 버스트 문제를 이전 창의 비중으로 근사해 해결한다. 메모리 효율과 정확도의 균형이 좋다.
Token Bucket: 토큰이 충전되는 속도로 장기 평균을 제어하면서 버스트를 허용한다. AWS API Gateway, Stripe API가 이 방식을 사용한다.
Leaky Bucket: 요청을 큐에 넣고 일정 속도로 처리해 트래픽을 평탄화한다. 실시간 응답보다 배치 처리에 적합하다.
Redis Sliding Window 구현
import time
import redis

r = redis.Redis(host="localhost", port=6379, decode_responses=True)

def is_rate_limited(user_id: str, limit: int = 100, window: int = 60) -> bool:
    key = f"ratelimit:{user_id}"
    now = time.time()

    pipe = r.pipeline()
    # 창 밖의 오래된 타임스탬프 제거
    pipe.zremrangebyscore(key, 0, now - window)
    # 현재 요청 추가
    pipe.zadd(key, {str(now): now})
    # 현재 창 내 요청 수
    pipe.zcard(key)
    # TTL 설정 (메모리 누수 방지)
    pipe.expire(key, window)
    results = pipe.execute()

    count = results[2]
    return count > limit

# FastAPI 미들웨어
from fastapi import Request, HTTPException
from functools import wraps

def rate_limit(limit: int = 60, window: int = 60):
    def decorator(func):
        @wraps(func)
        async def wrapper(request: Request, *args, **kwargs):
            # 인증된 사용자는 user_id, 미인증은 IP 기반
            user_key = getattr(request.state, "user_id", request.client.host)
            if is_rate_limited(user_key, limit, window):
                raise HTTPException(
                    status_code=429,
                    detail="Rate limit exceeded",
                    headers={"Retry-After": str(window)}
                )
            return await func(request, *args, **kwargs)
        return wrapper
    return decorator

@app.get("/api/data")
@rate_limit(limit=100, window=60)
async def get_data(request: Request):
    return {"data": "..."}
Token Bucket 구현 (Redis Lua 스크립트)
-- token_bucket.lua
-- KEYS[1]: 버킷 키
-- ARGV[1]: 용량(capacity), ARGV[2]: 보충 속도(rate/sec), ARGV[3]: 요청 토큰 수
local key = KEYS[1]
local capacity = tonumber(ARGV[1])
local rate = tonumber(ARGV[2])
local requested = tonumber(ARGV[3])
local now = tonumber(redis.call("TIME")[1])

local bucket = redis.call("HMGET", key, "tokens", "last_refill")
local tokens = tonumber(bucket[1]) or capacity
local last_refill = tonumber(bucket[2]) or now

-- 경과 시간만큼 토큰 보충
local elapsed = now - last_refill
tokens = math.min(capacity, tokens + elapsed * rate)

if tokens >= requested then
    tokens = tokens - requested
    redis.call("HMSET", key, "tokens", tokens, "last_refill", now)
    redis.call("EXPIRE", key, math.ceil(capacity / rate) + 1)
    return 1  -- 허용
else
    redis.call("HMSET", key, "tokens", tokens, "last_refill", now)
    return 0  -- 거부
end
# Lua 스크립트 실행
with open("token_bucket.lua") as f:
script = r.register_script(f.read())
def allow_request(user_id: str, capacity=100, rate=1.0, tokens=1) -> bool:
result = script(
keys=[f"token_bucket:{user_id}"],
args=[capacity, rate, tokens]
)
return bool(result)계층별 Rate Limit 전략
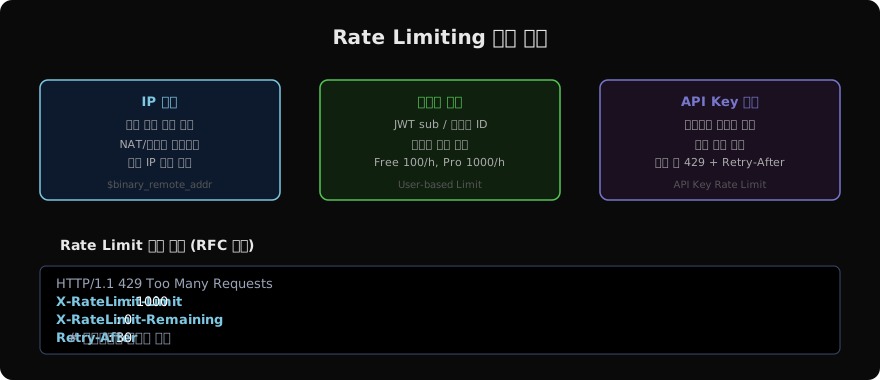
# 플랜별 차등 Rate Limit
PLAN_LIMITS = {
    "free":       {"limit": 100,   "window": 3600},
    "pro":        {"limit": 1000,  "window": 3600},
    "enterprise": {"limit": 10000, "window": 3600},
}

async def get_rate_limit_for_user(user) -> dict:
    return PLAN_LIMITS.get(user.plan, PLAN_LIMITS["free"])

# 엔드포인트별 별도 제한
ENDPOINT_LIMITS = {
    "/api/login":        {"limit": 5,    "window": 300},   # 5분에 5회
    "/api/sms/send":     {"limit": 3,    "window": 60},    # 1분에 3회
    "/api/export":       {"limit": 10,   "window": 3600},  # 1시간에 10회
    "/api/search":       {"limit": 30,   "window": 60},    # 1분에 30회
}
Express.js Rate Limiting
import rateLimit from "express-rate-limit";
import RedisStore from "rate-limit-redis";
import { createClient } from "redis";

const redisClient = createClient({ url: process.env.REDIS_URL });

// IP 기반 글로벌 제한
export const globalLimiter = rateLimit({
  windowMs: 15 * 60 * 1000,  // 15분
  max: 100,
  standardHeaders: true,      // X-RateLimit-* 헤더 포함
  legacyHeaders: false,
  store: new RedisStore({ sendCommand: (...args) => redisClient.sendCommand(args) }),
  handler: (req, res) => {
    res.status(429).json({
      error: "Too Many Requests",
      retryAfter: Math.ceil(req.rateLimit.resetTime / 1000)
    });
  }
});

// 로그인 엔드포인트 강화
export const loginLimiter = rateLimit({
  windowMs: 5 * 60 * 1000,   // 5분
  max: 5,
  skipSuccessfulRequests: true,  // 성공한 로그인은 카운트 제외
  keyGenerator: (req) => req.ip + req.body.email  // IP + 이메일 조합
});

app.use(globalLimiter);
app.post("/login", loginLimiter, loginHandler);
분산 환경 고려사항
# 멀티 인스턴스 배포: Redis 중앙화 필수
# 단순 메모리 카운터는 인스턴스별로 분리되어 정확하지 않음

# Redis Cluster 사용 시 키 슬롯 고정 (해시 태그)
def get_redis_key(user_id: str) -> str:
    # {user_id} 해시 태그로 같은 슬롯에 배치
    return f"{{ratelimit:{user_id}}}"

# 고가용성: Redis Sentinel + 자동 장애 조치
# Rate Limit Redis 장애 시 fallback: 허용 vs 거부
# 보안 중요 엔드포인트(로그인): 거부 (fail-closed)
# 일반 API: 허용 (fail-open) + 모니터링 알람
지난 글: DDoS 완화: 분산 서비스 거부 공격 방어 전략
다음 글: 입력 검증과 출력 인코딩: 인젝션 공격의 근본 방어
읽어주셔서 감사합니다. 😊
PALDYN / ARTICLE AI
글의 개념, 수식, 코드에 대해 물어보세요.
질문과 관련된 문단을 골라 답변의 문맥으로 사용합니다.생각 중 · 0초