

에러 모니터링 — Sentry로 프로덕션 오류 추적하기
Next.js 프로젝트에 Sentry를 통합해 서버·클라이언트·엣지 환경의 에러를 실시간으로 추적하는 방법을 설명합니다. error.tsx, global-error.tsx, instrumentation.ts, onRequestError 활용까지 다룹니다.
지난 글에서 MDX로 콘텐츠를 작성하는 방법을 살펴봤다. 이번 글은 에러 모니터링이다. 프로덕션 환경에서 에러는 반드시 발생한다. 로컬에서 재현되지 않는 오류, 특정 사용자만 겪는 문제를 추적하려면 에러 모니터링 도구가 필수다. Next.js와 가장 잘 통합되는 Sentry를 기준으로 설명한다.
Next.js의 에러 처리 계층
Next.js는 에러를 처리하는 여러 계층을 제공한다.
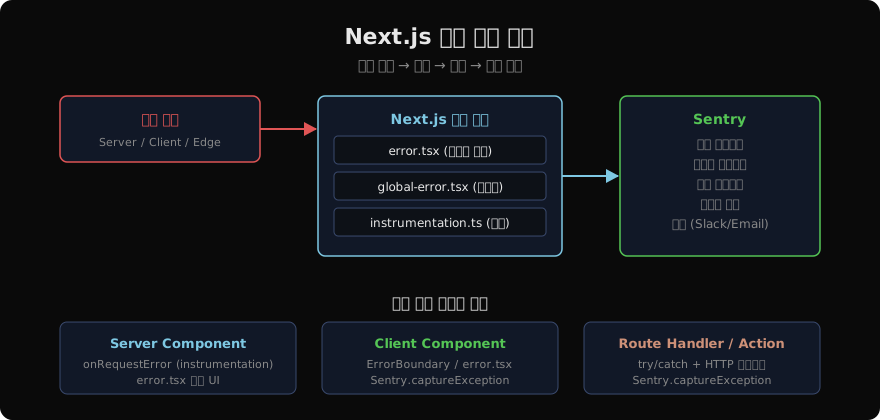
error.tsx — 페이지 수준 에러 UI
// app/blog/error.tsx
'use client'
import { useEffect } from 'react'

export default function Error({
  error,
  reset,
}: {
  error: Error & { digest?: string }
  reset: () => void
}) {
  useEffect(() => {
    // Sentry에 에러 보고
    console.error(error)
  }, [error])

  return (
    <div className="flex flex-col items-center gap-4 p-8">
      <h2 className="text-xl font-semibold text-red-400">오류가 발생했습니다</h2>
      <p className="text-gray-400">{error.message}</p>
      <button
        onClick={reset}
        className="px-4 py-2 bg-blue-600 rounded hover:bg-blue-700"
      >
        다시 시도
      </button>
    </div>
  )
}error.tsx는 반드시 Client Component여야 한다. reset() 함수를 호출하면 해당 라우트 세그먼트를 다시 렌더링 시도한다.
global-error.tsx — 루트 레이아웃 에러
// app/global-error.tsx
'use client'

export default function GlobalError({
  error,
  reset,
}: {
  error: Error & { digest?: string }
  reset: () => void
}) {
  return (
    <html>
      <body>
        <div className="min-h-screen flex items-center justify-center bg-gray-950">
          <div className="text-center">
            <h1 className="text-2xl text-red-400 mb-4">심각한 오류</h1>
            <button onClick={reset}>복구 시도</button>
          </div>
        </div>
      </body>
    </html>
  )
}
루트 layout.tsx 자체에서 에러가 발생할 때 동작한다. <html>, <body> 태그를 직접 포함해야 한다.
Sentry 통합
npx @sentry/wizard@latest -i nextjsWizard가 자동으로 설정 파일을 생성한다.
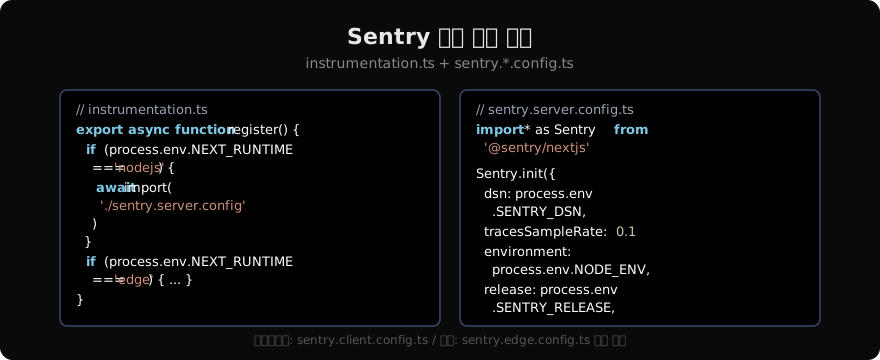
수동 설정 시:
// sentry.client.config.ts
import * as Sentry from '@sentry/nextjs'

Sentry.init({
  dsn: process.env.NEXT_PUBLIC_SENTRY_DSN,
  tracesSampleRate: 0.1,          // 10% 트랜잭션 샘플링
  replaysSessionSampleRate: 0.01, // 1% 세션 녹화
  replaysOnErrorSampleRate: 1.0,  // 에러 시 100% 세션 녹화
  integrations: [
    Sentry.replayIntegration(),   // Session Replay
  ],
  environment: process.env.NODE_ENV,
})
// sentry.server.config.ts
import * as Sentry from '@sentry/nextjs'
Sentry.init({
dsn: process.env.SENTRY_DSN,
tracesSampleRate: 0.1,
environment: process.env.NODE_ENV,
release: process.env.SENTRY_RELEASE, // git SHA 또는 버전
})instrumentation.ts로 서버 에러 추적
Next.js 15의 onRequestError 훅을 사용하면 서버 사이드 에러를 모두 잡을 수 있다.
// instrumentation.ts
import * as Sentry from '@sentry/nextjs'

export async function register() {
  if (process.env.NEXT_RUNTIME === 'nodejs') {
    await import('./sentry.server.config')
  }

  if (process.env.NEXT_RUNTIME === 'edge') {
    await import('./sentry.edge.config')
  }
}

export const onRequestError = Sentry.captureRequestErrorcaptureRequestError는 Server Component, Server Action, Route Handler에서 발생하는 에러를 자동으로 Sentry에 보고한다. 요청 URL, 헤더, 사용자 정보도 함께 포함된다.
수동 에러 보고
자동 포착 외에 특정 조건에서 수동으로 에러를 보고해야 할 때:
// 서버 / 클라이언트 어디서나
import * as Sentry from '@sentry/nextjs'

async function processPayment(orderId: string) {
  try {
    const result = await callPaymentAPI(orderId)
    return result
  } catch (error) {
    Sentry.captureException(error, {
      tags: { component: 'payment', orderId },
      extra: { orderId },
    })
    throw error // 에러는 위로 다시 전파
  }
}
사용자 컨텍스트 추가
// 로그인 후 Sentry에 사용자 정보 설정
import * as Sentry from '@sentry/nextjs'

Sentry.setUser({
  id: user.id,
  email: user.email,
  username: user.name,
})

// 로그아웃 시 제거
Sentry.setUser(null)
Sentry 없이 기본 에러 로깅
Sentry 도입 전이거나 셀프 호스팅 환경이라면 instrumentation.ts로 직접 에러를 기록할 수 있다.
// instrumentation.ts
export function onRequestError(
  error: { digest: string } & Error,
  request: {
    path: string
    method: string
    headers: Record<string, string>
  },
  context: {
    routerKind: 'Pages Router' | 'App Router'
    routePath: string
    routeType: 'render' | 'route' | 'action' | 'middleware'
    renderSource?: string
    revalidateReason?: string
  }
) {
  // 커스텀 로깅 서비스로 전송
  fetch('/api/log-error', {
    method: 'POST',
    body: JSON.stringify({
      message: error.message,
      path: request.path,
      route: context.routePath,
    }),
  }).catch(() => {}) // 로그 실패가 추가 에러 유발하지 않도록
}
SourceMap 업로드
에러 발생 위치를 트랜스파일 이전 원본 코드 줄 번호로 보려면 SourceMap을 Sentry에 업로드해야 한다.
// next.config.ts
import { withSentryConfig } from '@sentry/nextjs'

const nextConfig: NextConfig = {}

export default withSentryConfig(nextConfig, {
  org: 'my-org',
  project: 'my-nextjs-app',
  authToken: process.env.SENTRY_AUTH_TOKEN,
  silent: true,
  hideSourceMaps: true, // 클라이언트에 소스맵 노출 방지
})
지난 글: MDX — Next.js에서 마크다운으로 콘텐츠 작성하기
다음 글: 테스팅 — Jest와 React Testing Library로 단위 테스트 작성하기
읽어주셔서 감사합니다. 😊
PALDYN / ARTICLE AI
글의 개념, 수식, 코드에 대해 물어보세요.
질문과 관련된 문단을 골라 답변의 문맥으로 사용합니다.생각 중 · 0초