

지식
Next.js
MDX — Next.js에서 마크다운으로 콘텐츠 작성하기
Next.js App Router에서 @next/mdx와 next-mdx-remote를 사용해 MDX 콘텐츠를 렌더링하는 방법을 설명합니다. 커스텀 컴포넌트, frontmatter, remark/rehype 플러그인 활용까지 다룹니다.
지난 글에서 다국어 지원을 구현하는 방법을 살펴봤다. 이번 글은 MDX다. MDX는 마크다운에 JSX를 섞을 수 있는 포맷으로, 블로그·문서 사이트에 최적이다. Next.js는 @next/mdx와 next-mdx-remote 두 가지 방식을 지원한다.
MDX란
---
title: 나의 첫 MDX 포스트
---

# 제목

마크다운 문법으로 텍스트를 작성하고...

import { Chart } from './Chart'

**JSX 컴포넌트도 바로 사용**할 수 있습니다.

<Chart data={[10, 20, 30]} />
마크다운의 간결함과 React 컴포넌트의 표현력을 함께 쓸 수 있다.
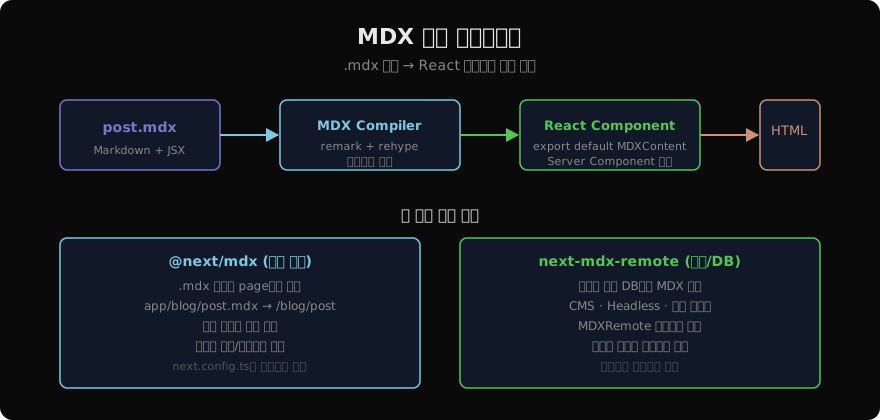
방식 1: @next/mdx (파일 기반)
프로젝트 내 .mdx 파일을 페이지처럼 사용하는 방식이다. 소규모 블로그나 문서 사이트에 적합하다.
npm install @next/mdx @mdx-js/loader @mdx-js/react
npm install -D @types/mdx
// next.config.ts
import type { NextConfig } from 'next'
import createMDX from '@next/mdx'
const withMDX = createMDX({
options: {
remarkPlugins: [],
rehypePlugins: [],
},
})
const nextConfig: NextConfig = {
pageExtensions: ['js', 'jsx', 'md', 'mdx', 'ts', 'tsx'],
}
export default withMDX(nextConfig)pageExtensions에 md와 mdx를 추가하면 app/blog/post.mdx가 /blog/post 경로로 자동 라우팅된다.
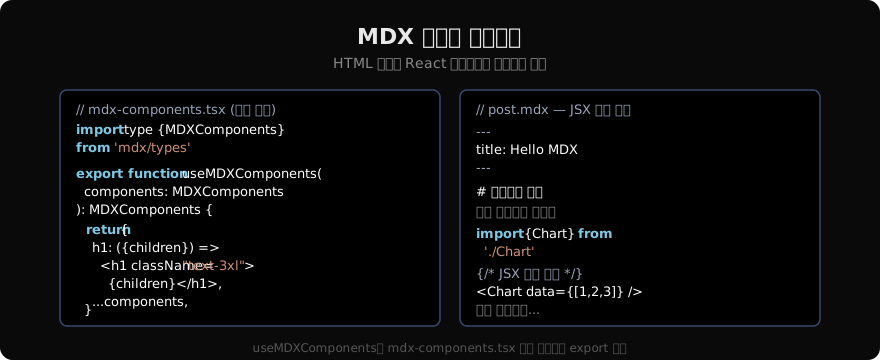
// mdx-components.tsx (프로젝트 루트 — 필수)
import type { MDXComponents } from 'mdx/types'

export function useMDXComponents(components: MDXComponents): MDXComponents {
  return {
    h1: ({ children }) => (
      <h1 className="text-3xl font-bold my-6 text-gray-100">{children}</h1>
    ),
    h2: ({ children }) => (
      <h2 className="text-2xl font-semibold my-5 text-gray-200">{children}</h2>
    ),
    code: ({ children }) => (
      <code className="bg-gray-800 px-1.5 py-0.5 rounded text-sm font-mono">
        {children}
      </code>
    ),
    ...components,
  }
}
방식 2: next-mdx-remote (동적 콘텐츠)
CMS, 데이터베이스, 파일 시스템 등 외부 소스에서 MDX 문자열을 불러와 렌더링하는 방식이다.
npm install next-mdx-remote// app/blog/[slug]/page.tsx
import { MDXRemote } from 'next-mdx-remote/rsc'
import { readFileSync } from 'fs'
import path from 'path'
// 커스텀 컴포넌트
const components = {
Callout: ({ children }: { children: React.ReactNode }) => (
<div className="border-l-4 border-blue-500 pl-4 py-2 bg-blue-950">
{children}
</div>
),
Chart: dynamic(() => import('@/components/Chart'), { ssr: false }),
}
export default async function BlogPost({
params: { slug },
}: {
params: { slug: string }
}) {
const filePath = path.join(process.cwd(), 'content', `${slug}.mdx`)
const source = readFileSync(filePath, 'utf-8')
return (
<article className="prose prose-invert max-w-none">
<MDXRemote
source={source}
components={components}
options={{
parseFrontmatter: true,
}}
/>
</article>
)
}/rsc 경로로 가져오면 Server Component에서 직접 사용 가능하다. 별도 hydration 없이 서버에서 렌더링된다.
frontmatter 처리
---
title: "MDX로 작성한 블로그 포스트"
pubDate: "2026-06-06"
tags: ["nextjs", "mdx"]
---

본문 내용...
// app/blog/[slug]/page.tsx
import { compileMDX } from 'next-mdx-remote/rsc'
interface Frontmatter {
title: string
pubDate: string
tags: string[]
}
export default async function BlogPost({
params: { slug },
}: {
params: { slug: string }
}) {
const source = await fetchPostSource(slug) // MDX 문자열 가져오기
const { content, frontmatter } = await compileMDX<Frontmatter>({
source,
options: { parseFrontmatter: true },
})
return (
<article>
<h1>{frontmatter.title}</h1>
<time>{frontmatter.pubDate}</time>
<div className="prose prose-invert">{content}</div>
</article>
)
}remark/rehype 플러그인
npm install rehype-highlight remark-gfm rehype-slug rehype-autolink-headings// next.config.ts (또는 compileMDX options)
import rehypeHighlight from 'rehype-highlight'
import remarkGfm from 'remark-gfm'
import rehypeSlug from 'rehype-slug'
const withMDX = createMDX({
options: {
remarkPlugins: [
remarkGfm, // GitHub Flavored Markdown (표, 체크박스 등)
],
rehypePlugins: [
rehypeSlug, // 헤딩에 id 자동 추가
rehypeHighlight, // 코드 블록 신택스 하이라이팅
],
},
})자주 쓰이는 플러그인:
| 플러그인 | 기능 |
|---|---|
remark-gfm | 표, 취소선, 체크박스 |
rehype-slug | 헤딩에 id 속성 자동 추가 |
rehype-autolink-headings | 헤딩 앵커 링크 |
rehype-highlight | 코드 신택스 하이라이팅 |
rehype-pretty-code | Shiki 기반 고품질 하이라이팅 |
목차(TOC) 자동 생성
// lib/mdx.ts
import { compileMDX } from 'next-mdx-remote/rsc'
import rehypeSlug from 'rehype-slug'

interface TocItem {
  id: string
  title: string
  level: number
}

export async function getMdxContent(source: string) {
  const toc: TocItem[] = []

  const { content, frontmatter } = await compileMDX({
    source,
    options: {
      parseFrontmatter: true,
      mdxOptions: {
        rehypePlugins: [
          rehypeSlug,
          // 커스텀 플러그인으로 TOC 수집
        ],
      },
    },
  })

  return { content, frontmatter, toc }
}
지난 글: 국제화(i18n) — Next.js에서 다국어 지원 구현하기
다음 글: 에러 모니터링 — Sentry로 프로덕션 오류 추적하기
읽어주셔서 감사합니다. 😊
PALDYN / ARTICLE AI
글의 개념, 수식, 코드에 대해 물어보세요.
질문과 관련된 문단을 골라 답변의 문맥으로 사용합니다.생각 중 · 0초