

지식
Next.js
국제화(i18n) — Next.js에서 다국어 지원 구현하기
Next.js App Router에서 next-intl 라이브러리를 사용해 다국어(i18n) 지원을 구현하는 방법을 설명합니다. 로케일 라우팅, 번역 파일 구성, 미들웨어 설정, Server/Client Component에서 번역 사용까지 다룹니다.
지난 글에서 Core Web Vitals 중심의 성능 최적화 전략을 살펴봤다. 이번 글은 국제화(i18n)다. 글로벌 서비스를 목표로 한다면 다국어 지원은 필수다. Next.js App Router는 기본적으로 i18n 라우팅을 지원하지 않으므로, 별도 라이브러리가 필요하다. 현재 가장 널리 쓰이는 next-intl을 기준으로 설명한다.
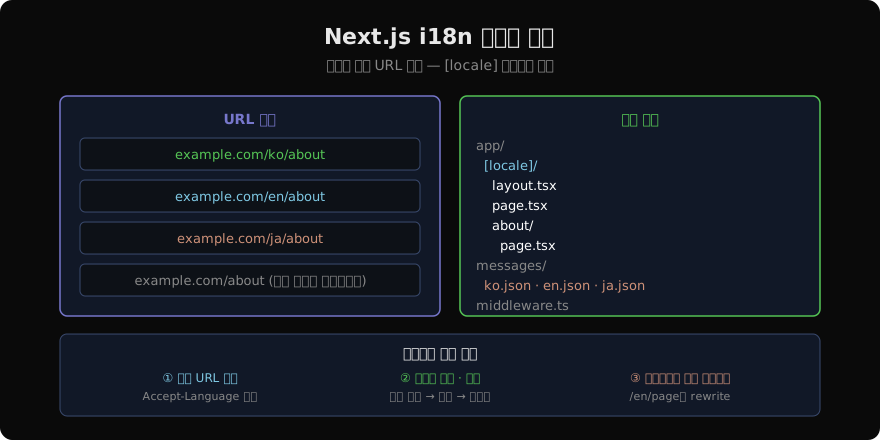
아키텍처 선택: URL 기반 로케일
다국어 사이트의 URL 구조는 크게 세 가지다.
| 방식 | 예시 | 비고 |
|---|---|---|
| 서브패스 | /ko/about | 가장 일반적, SEO 명확 |
| 서브도메인 | ko.example.com | 큰 서비스에 적합 |
| 쿼리 파라미터 | /about?lang=ko | SEO 비권장 |
App Router에서는 [locale] 동적 세그먼트를 사용한 서브패스 방식이 표준이다.
next-intl 설치 및 기본 설정
npm install next-intl// next.config.ts
import type { NextConfig } from 'next'
import createNextIntlPlugin from 'next-intl/plugin'
const withNextIntl = createNextIntlPlugin()
const nextConfig: NextConfig = {}
export default withNextIntl(nextConfig)// i18n/request.ts
import { getRequestConfig } from 'next-intl/server'
import { routing } from './routing'
export default getRequestConfig(async ({ requestLocale }) => {
let locale = await requestLocale
if (!locale || !routing.locales.includes(locale as any)) {
locale = routing.defaultLocale
}
return {
locale,
messages: (await import(`../messages/${locale}.json`)).default,
}
})// i18n/routing.ts
import { defineRouting } from 'next-intl/routing'
export const routing = defineRouting({
locales: ['ko', 'en', 'ja'],
defaultLocale: 'ko',
})파일 구조
app/
  [locale]/
    layout.tsx      ← locale을 html lang에 적용
    page.tsx
    about/
      page.tsx
  layout.tsx        ← 최상위 (locale 없음)

i18n/
  routing.ts
  request.ts

messages/
  ko.json
  en.json
  ja.json

middleware.ts
번역 파일
// messages/ko.json
{
  "nav": {
    "home": "홈",
    "about": "소개",
    "blog": "블로그"
  },
  "about": {
    "title": "회사 소개",
    "description": "저희 서비스에 오신 것을 환영합니다."
  },
  "common": {
    "readMore": "더 읽기",
    "loading": "로딩 중...",
    "error": "오류가 발생했습니다."
  }
}
// messages/en.json
{
"nav": {
"home": "Home",
"about": "About",
"blog": "Blog"
},
"about": {
"title": "About Us",
"description": "Welcome to our service."
},
"common": {
"readMore": "Read more",
"loading": "Loading...",
"error": "An error occurred."
}
}미들웨어 설정
// middleware.ts
import createMiddleware from 'next-intl/middleware'
import { routing } from './i18n/routing'

export default createMiddleware(routing)

export const config = {
  matcher: [
    '/((?!api|_next|_vercel|.*\\..*).*)',
  ],
}
미들웨어가 Accept-Language 헤더를 분석해 자동으로 적절한 로케일로 리다이렉트한다.
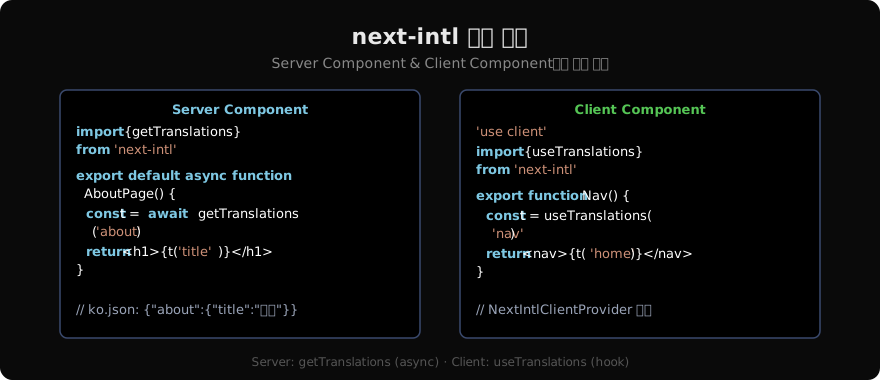
Server/Client Component에서 번역 사용
// app/[locale]/layout.tsx
import { NextIntlClientProvider } from 'next-intl'
import { getMessages } from 'next-intl/server'

export default async function LocaleLayout({
  children,
  params: { locale },
}: {
  children: React.ReactNode
  params: { locale: string }
}) {
  const messages = await getMessages()

  return (
    <html lang={locale}>
      <body>
        <NextIntlClientProvider messages={messages}>
          {children}
        </NextIntlClientProvider>
      </body>
    </html>
  )
}
// app/[locale]/about/page.tsx — Server Component
import { getTranslations } from 'next-intl/server'
export default async function AboutPage() {
const t = await getTranslations('about')
return (
<main>
<h1>{t('title')}</h1>
<p>{t('description')}</p>
</main>
)
}// components/Nav.tsx — Client Component
'use client'
import { useTranslations } from 'next-intl'
export function Nav() {
const t = useTranslations('nav')
return (
<nav>
<a href="/">{t('home')}</a>
<a href="/about">{t('about')}</a>
</nav>
)
}로케일별 메타데이터
// app/[locale]/about/page.tsx
import { getTranslations } from 'next-intl/server'
import type { Metadata } from 'next'

export async function generateMetadata({
  params: { locale },
}: {
  params: { locale: string }
}): Promise<Metadata> {
  const t = await getTranslations({ locale, namespace: 'about' })

  return {
    title: t('title'),
    description: t('description'),
  }
}
로케일 전환 UI
// components/LocaleSwitcher.tsx
'use client'
import { usePathname, useRouter } from 'next/navigation'
import { useLocale } from 'next-intl'

const locales = [
  { code: 'ko', label: '한국어' },
  { code: 'en', label: 'English' },
  { code: 'ja', label: '日本語' },
]

export function LocaleSwitcher() {
  const router = useRouter()
  const pathname = usePathname()
  const currentLocale = useLocale()

  const switchLocale = (newLocale: string) => {
    // /ko/about → /en/about
    const newPath = pathname.replace(`/${currentLocale}`, `/${newLocale}`)
    router.push(newPath)
  }

  return (
    <div>
      {locales.map(({ code, label }) => (
        <button
          key={code}
          onClick={() => switchLocale(code)}
          className={currentLocale === code ? 'font-bold' : ''}
        >
          {label}
        </button>
      ))}
    </div>
  )
}
generateStaticParams로 정적 생성
// app/[locale]/page.tsx
import { routing } from '@/i18n/routing'

export function generateStaticParams() {
  return routing.locales.map((locale) => ({ locale }))
}
이 함수를 추가하면 빌드 시 지원하는 모든 로케일에 대해 정적 페이지를 미리 생성한다.
지난 글: 성능 최적화 — Core Web Vitals 개선 전략
다음 글: MDX — Next.js에서 마크다운으로 콘텐츠 작성하기
읽어주셔서 감사합니다. 😊
PALDYN / ARTICLE AI
글의 개념, 수식, 코드에 대해 물어보세요.
질문과 관련된 문단을 골라 답변의 문맥으로 사용합니다.생각 중 · 0초