

React 19 Actions — 폼과 비동기 처리의 새로운 방식
React 19 Actions의 개념, form action에 async 함수를 전달하는 방법, useFormStatus와 useOptimistic과의 통합 패턴을 설명합니다.
지난 글에서 use() 훅으로 Promise와 Context를 읽는 방법을 살펴봤다. React 19의 또 다른 핵심 변화는 Actions다. Actions는 폼의 action 속성에 async 함수를 직접 전달할 수 있게 해주며, 비동기 작업 중 pending 상태를 자동으로 관리한다.
Actions란 무엇인가?
기존에는 폼 제출을 처리할 때 onSubmit 이벤트 핸들러를 사용하고, e.preventDefault(), useState로 pending 상태 관리, 에러 처리 등을 모두 직접 구현해야 했다. React 19 Actions는 이 패턴을 근본적으로 단순화한다.
// React 19: form action에 async 함수 직접 전달
function UpdateNameForm() {
  const [name, setName] = useState('홍길동');

  async function updateName(formData: FormData) {
    const newName = formData.get('name') as string;
    await saveToDatabase(newName);
    setName(newName);
  }

  return (
    <form action={updateName}>
      <input name="name" defaultValue={name} />
      <button type="submit">저장</button>
    </form>
  );
}e.preventDefault()가 필요 없고, FormData가 인자로 자동 전달된다. 폼은 Action이 완료되면 자동으로 리셋된다.
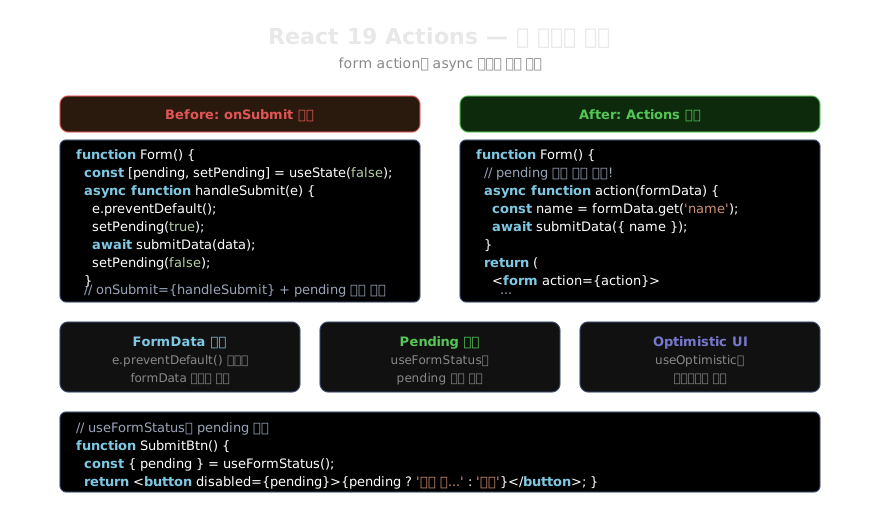
Actions의 세 가지 특성
1. 자동 pending 관리 — Action이 실행되는 동안 React는 내부적으로 트랜지션 상태를 만든다. useFormStatus로 이 상태를 읽을 수 있다.
2. 낙관적 업데이트 — useOptimistic과 자연스럽게 통합된다.
3. 에러 처리 — Action에서 throw되는 에러는 가장 가까운 Error Boundary가 잡는다.
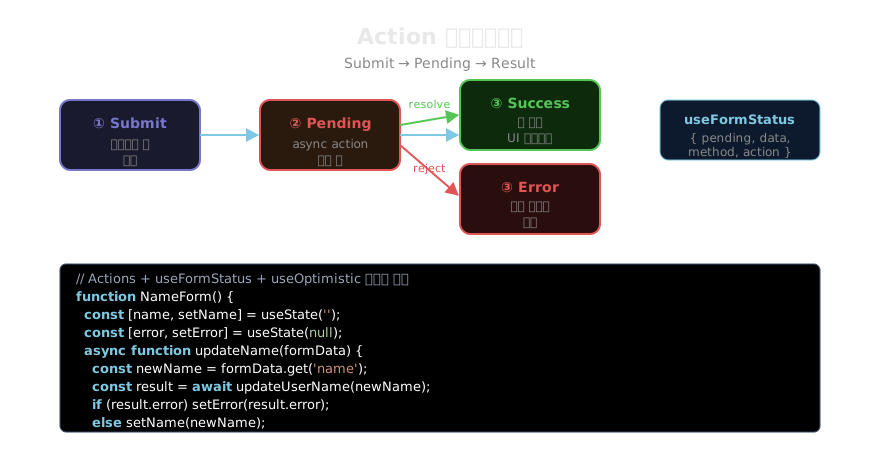
useFormStatus — pending 상태 읽기
useFormStatus는 폼 Action의 상태를 읽는 훅이다. 반드시 <form> 안의 자식 컴포넌트에서 호출해야 한다.
import { useFormStatus } from 'react-dom';

function SubmitButton() {
  const { pending } = useFormStatus();
  return (
    <button type="submit" disabled={pending}>
      {pending ? '저장 중...' : '저장'}
    </button>
  );
}

function UpdateNameForm() {
  async function updateName(formData: FormData) {
    await saveToDatabase(formData.get('name'));
  }

  return (
    <form action={updateName}>
      <input name="name" placeholder="새 이름" />
      <SubmitButton /> {/* form 안에 있어야 useFormStatus 사용 가능 */}
    </form>
  );
}useFormStatus가 반환하는 객체에는 pending 외에도 data(FormData), method, action이 있다. 이를 활용해 제출 중 입력 값을 미리 보여줄 수도 있다.
startTransition으로 직접 Action 트리거
폼이 없는 경우에도 startTransition에 async 함수를 전달해 Action으로 실행할 수 있다.
import { useTransition } from 'react';

function LikeButton({ postId }: { postId: string }) {
  const [isPending, startTransition] = useTransition();
  const [liked, setLiked] = useState(false);

  function handleLike() {
    startTransition(async () => {
      await likePost(postId); // async 함수를 직접 전달
      setLiked(true);
    });
  }

  return (
    <button onClick={handleLike} disabled={isPending}>
      {isPending ? '처리 중...' : liked ? '좋아요 ♥' : '좋아요 ♡'}
    </button>
  );
}
React 18까지는 startTransition에 async 함수를 전달할 수 없었지만, React 19에서는 가능하다.
에러 처리
Action에서 에러가 발생하면 Error Boundary가 처리한다. 그러나 useActionState를 사용하면 컴포넌트 내부에서 에러를 직접 다룰 수 있다.
async function submitAction(prevState: State, formData: FormData): Promise<State> {
  try {
    const name = formData.get('name') as string;
    if (!name) return { error: '이름을 입력해주세요', name: prevState.name };
    await saveToDatabase(name);
    return { error: null, name };
  } catch {
    return { error: '저장에 실패했습니다', name: prevState.name };
  }
}
이 패턴은 다음 글에서 살펴볼 useActionState의 핵심이다.
Actions와 Server Actions
Next.js 등의 프레임워크에서는 Actions를 서버 함수로도 만들 수 있다. 'use server' 지시어를 붙이면 해당 함수는 서버에서 실행되고, 클라이언트는 네트워크 요청을 통해 호출한다.
// actions.ts (서버 파일)
'use server';
export async function updateProfile(formData: FormData) {
  const name = formData.get('name');
  await db.user.update({ name }); // 서버에서만 실행
}

// 클라이언트 컴포넌트
import { updateProfile } from './actions';

function ProfileForm() {
  return (
    <form action={updateProfile}> {/* 서버 함수를 action으로 */}
      <input name="name" />
      <button type="submit">업데이트</button>
    </form>
  );
}
Actions는 React 19의 변화 중 가장 실용적인 부분이다. 폼 처리 코드를 크게 줄여주고, pending 상태 관리를 자동화해 개발자 경험을 개선한다. 다음 글에서는 useActionState로 Action의 결과 상태를 관리하는 방법을 살펴본다.
지난 글: use() 훅 — Promise와 Context를 조건문 안에서 읽기
다음 글: useActionState로 Action 결과 상태 관리하기
읽어주셔서 감사합니다. 😊
PALDYN / ARTICLE AI
글의 개념, 수식, 코드에 대해 물어보세요.
질문과 관련된 문단을 골라 답변의 문맥으로 사용합니다.생각 중 · 0초