

에러 경계 심화: 복구·리셋·에러 추적
react-error-boundary의 resetKeys로 에러 상태를 자동 초기화하는 방법, 에러 경계의 계층적 배치 전략, Sentry 연동 패턴을 깊이 있게 설명합니다.
지난 글에서 에러 경계의 기본 개념과 구현 방법을 살펴봤다. 이번에는 실제 운영 환경에서 필요한 복구 패턴, 자동 리셋, 에러 추적 연동을 다룬다.
사용자 경험 중심의 Fallback UI
에러 경계의 fallback UI는 단순히 에러 메시지를 보여주는 것이 아니라, 사용자가 다음 행동을 할 수 있도록 설계해야 한다.
import { ErrorBoundary, FallbackProps } from 'react-error-boundary';

function ErrorFallback({ error, resetErrorBoundary }: FallbackProps) {
  return (
    <div role="alert" className="error-container">
      <h2>이 섹션을 불러오는 중 문제가 발생했습니다</h2>
      <p className="error-detail">{error.message}</p>
      <div className="error-actions">
        <button onClick={resetErrorBoundary}>다시 시도</button>
        <button onClick={() => window.location.reload()}>페이지 새로고침</button>
      </div>
    </div>
  );
}resetErrorBoundary는 에러 경계의 hasError 상태를 false로 되돌리고 자식을 재렌더링한다. 이 함수는 onReset 콜백을 호출한 후 상태를 초기화한다.
resetKeys로 자동 리셋
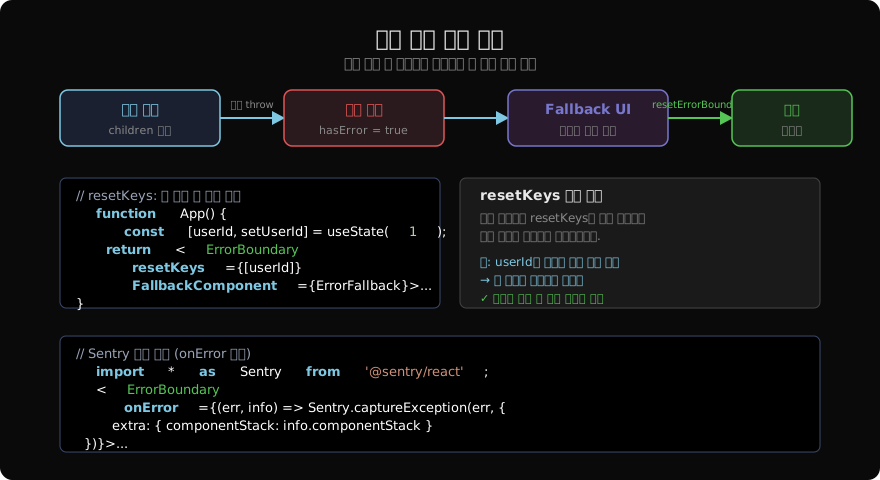
resetKeys는 강력한 기능이다. 지정한 값이 변경되면 에러 경계가 자동으로 초기화된다.
function UserProfile({ userId }: { userId: string }) {
  return (
    <ErrorBoundary
      FallbackComponent={ErrorFallback}
      resetKeys={[userId]}
      onReset={() => {
        // 리셋 시 부가 작업 (캐시 클리어 등)
        queryClient.invalidateQueries(['user', userId]);
      }}
    >
      <UserDetails userId={userId} />
    </ErrorBoundary>
  );
}userId가 바뀌면(다른 사용자 프로필로 이동) 에러 경계가 자동으로 리셋되고, 새 데이터로 다시 시도한다. 이 패턴은 라우트 변경 시 에러 경계를 자동 초기화하는 데 특히 유용하다.
리셋 후 콜백 활용
<ErrorBoundary
  FallbackComponent={ErrorFallback}
  onError={(error, info) => {
    // 에러 발생 시 호출 — 로깅
    logger.error(error, { componentStack: info.componentStack });
  }}
  onReset={(details) => {
    // 리셋 발생 시 호출
    if (details.reason === 'resetRoot') {
      // resetErrorBoundary 버튼 클릭
    } else if (details.reason === 'keys') {
      // resetKeys 변경으로 인한 자동 리셋
    }
  }}
>
  {children}
</ErrorBoundary>
에러 경계 계층 배치
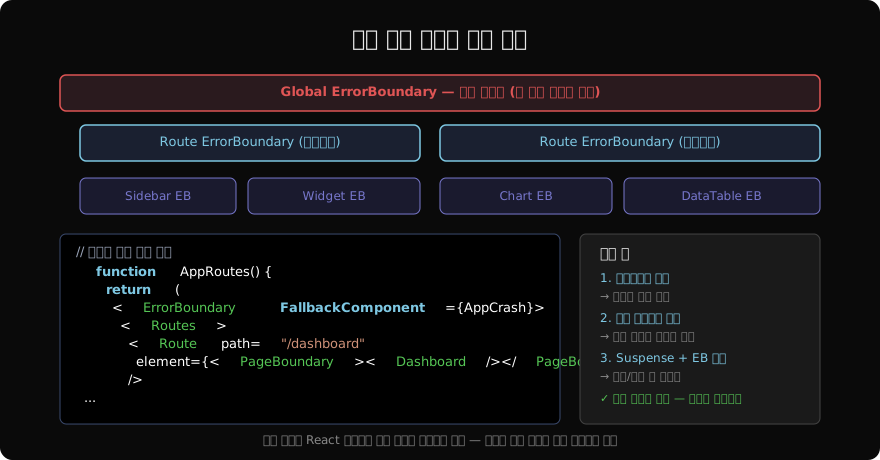
실제 앱에서는 여러 계층에 에러 경계를 배치한다:
// 1. 전역 에러 경계 (최후 안전망)
function App() {
  return (
    <ErrorBoundary FallbackComponent={AppCrashPage}>
      <Router>
        <Routes>
          {/* 2. 라우트별 에러 경계 */}
          <Route
            path="/dashboard"
            element={
              <ErrorBoundary
                FallbackComponent={PageErrorFallback}
                resetKeys={[location.pathname]}
              >
                <Dashboard />
              </ErrorBoundary>
            }
          />
        </Routes>
      </Router>
    </ErrorBoundary>
  );
}

// 3. 컴포넌트별 에러 경계
function Dashboard() {
  return (
    <div className="dashboard">
      <ErrorBoundary FallbackComponent={WidgetError}>
        <RevenueChart />
      </ErrorBoundary>
      <ErrorBoundary FallbackComponent={WidgetError}>
        <UserTable />
      </ErrorBoundary>
    </div>
  );
}
RevenueChart에서 에러가 발생해도 UserTable은 정상 동작한다.
Sentry 연동
에러 경계와 Sentry를 연동하면 운영 중 발생하는 모든 렌더 에러를 추적할 수 있다.
import * as Sentry from '@sentry/react';

// Sentry는 자체 ErrorBoundary를 제공
import { ErrorBoundary as SentryErrorBoundary } from '@sentry/react';

function App() {
  return (
    <SentryErrorBoundary
      fallback={<AppCrashPage />}
      showDialog // Sentry 사용자 피드백 다이얼로그
      beforeCapture={(scope, error, componentStack) => {
        scope.setTag('boundary', 'global');
        scope.setExtra('componentStack', componentStack);
      }}
    >
      <Router />
    </SentryErrorBoundary>
  );
}
직접 onError로 연동하는 방법:
<ErrorBoundary
  FallbackComponent={ErrorFallback}
  onError={(error, info) => {
    Sentry.withScope((scope) => {
      scope.setExtra('componentStack', info.componentStack);
      Sentry.captureException(error);
    });
  }}
>
  {children}
</ErrorBoundary>
useErrorBoundary로 비동기 에러 전파
이벤트 핸들러나 비동기 코드의 에러는 에러 경계가 자동으로 잡지 못한다. useErrorBoundary 훅으로 수동으로 전파한다:
import { useErrorBoundary } from 'react-error-boundary';

function DataLoader({ id }: { id: string }) {
  const { showBoundary } = useErrorBoundary();
  const [data, setData] = useState(null);

  useEffect(() => {
    fetch(`/api/data/${id}`)
      .then((res) => {
        if (!res.ok) throw new Error(`HTTP ${res.status}`);
        return res.json();
      })
      .then(setData)
      .catch(showBoundary); // 에러 경계로 전파
  }, [id]);

  return data ? <DataView data={data} /> : <Loading />;
}
이렇게 하면 비동기 fetch 에러도 가장 가까운 상위 에러 경계에서 처리된다.
에러 경계와 React Query 연동
React Query를 사용한다면, query 에러를 에러 경계로 전파하는 옵션이 있다:
const { data } = useQuery({
  queryKey: ['user', id],
  queryFn: fetchUser,
  throwOnError: true, // 에러 발생 시 에러 경계로 전파
});
Suspense와 함께 쓰면 로딩 상태는 Suspense가, 에러 상태는 에러 경계가 담당하는 명확한 관심사 분리가 이루어진다.
테스트 작성
import { render, screen } from '@testing-library/react';
import userEvent from '@testing-library/user-event';
import { ErrorBoundary } from 'react-error-boundary';

function Thrower({ shouldThrow }: { shouldThrow: boolean }) {
  if (shouldThrow) throw new Error('테스트 에러');
  return <div>정상</div>;
}

test('에러 발생 시 fallback을 보여준다', () => {
  // console.error 노이즈 억제
  jest.spyOn(console, 'error').mockImplementation(() => {});

  render(
    <ErrorBoundary fallback={<div>에러 발생</div>}>
      <Thrower shouldThrow />
    </ErrorBoundary>
  );

  expect(screen.getByText('에러 발생')).toBeInTheDocument();
});
지난 글: 에러 경계(Error Boundary)로 안전한 UI 만들기
다음 글: Suspense로 비동기 UI 선언적으로 처리하기
읽어주셔서 감사합니다. 😊
PALDYN / ARTICLE AI
글의 개념, 수식, 코드에 대해 물어보세요.
질문과 관련된 문단을 골라 답변의 문맥으로 사용합니다.생각 중 · 0초