

에러 경계(Error Boundary)로 안전한 UI 만들기
React 에러 경계의 개념, getDerivedStateFromError와 componentDidCatch의 역할, react-error-boundary 라이브러리를 이용한 실전 패턴을 설명합니다.
지난 글에서 애니메이션 구현 방법을 살펴봤다. 이번에는 앱의 견고함을 높이는 에러 경계(Error Boundary) 를 다룬다. 컴포넌트 트리 일부에서 런타임 에러가 발생했을 때 전체 앱이 망가지는 대신, 해당 영역만 격리하고 사용자에게 적절한 메시지를 보여주는 기법이다.
에러 경계란?
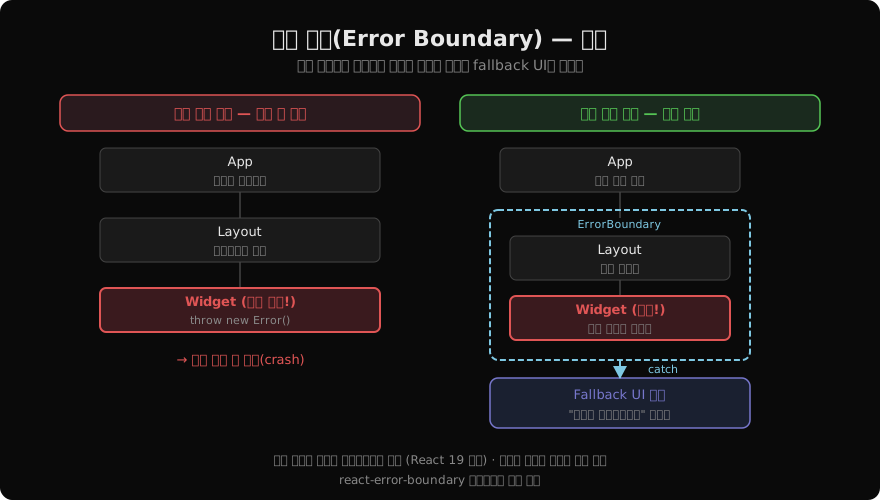
React 앱에서 컴포넌트가 렌더링 도중 에러를 던지면 기본적으로 React는 전체 컴포넌트 트리를 언마운트한다. 사용자 화면은 빈 화면이 된다.
에러 경계는 자식 컴포넌트 트리에서 발생한 에러를 가로채 두 가지 역할을 한다:
- 격리: 에러가 발생한 영역만 fallback UI로 대체
- 로깅:
componentDidCatch를 통해 에러 정보를 외부 서비스로 전송
클래스 컴포넌트로 구현
에러 경계는 두 가지 특수한 생명주기 메서드를 사용하기 때문에 반드시 클래스 컴포넌트로 작성해야 한다 (React 19 이전 기준). 함수형 컴포넌트에는 이 메서드들이 없다.
import { Component, ReactNode } from 'react';

interface Props {
  fallback: ReactNode;
  children: ReactNode;
}

interface State {
  hasError: boolean;
  error: Error | null;
}

class ErrorBoundary extends Component<Props, State> {
  state: State = { hasError: false, error: null };

  static getDerivedStateFromError(error: Error): State {
    return { hasError: true, error };
  }

  componentDidCatch(error: Error, info: { componentStack: string }) {
    // 에러 추적 서비스(Sentry 등)에 전송
    console.error('Error caught by boundary:', error, info.componentStack);
  }

  render() {
    if (this.state.hasError) {
      return this.props.fallback;
    }
    return this.props.children;
  }
}
getDerivedStateFromError vs componentDidCatch
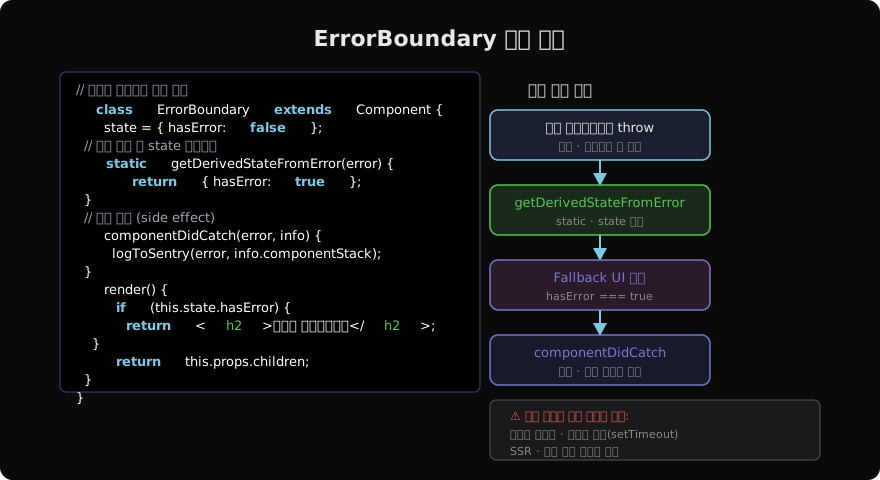
두 메서드는 역할이 다르다:
| 메서드 | 타이밍 | 용도 |
|---|---|---|
getDerivedStateFromError | 렌더 단계 (동기) | state 변경으로 fallback UI 표시 결정 |
componentDidCatch | 커밋 단계 (비동기 가능) | 에러 로깅, 분석 서비스 전송 |
getDerivedStateFromError는 static 메서드로, 순수 함수여야 한다(side effect 금지). side effect는 componentDidCatch에서 처리한다.
에러 경계가 잡지 못하는 케이스
에러 경계는 만능이 아니다. 다음 상황의 에러는 잡지 못한다:
- 이벤트 핸들러 (
onClick등): 렌더링 단계가 아니므로.try/catch로 직접 처리 - 비동기 코드 (
setTimeout,Promise): 별도 에러 처리 필요 - 서버 사이드 렌더링: SSR 환경에서 에러 경계는 동작하지 않음
- 에러 경계 자체의 에러: 부모 에러 경계로 전파
react-error-boundary 라이브러리
매번 클래스 컴포넌트를 직접 작성하는 것은 번거롭다. react-error-boundary 패키지가 이를 대체한다.
npm install react-error-boundaryErrorBoundary 컴포넌트
import { ErrorBoundary } from 'react-error-boundary';

function ErrorFallback({
  error,
  resetErrorBoundary,
}: {
  error: Error;
  resetErrorBoundary: () => void;
}) {
  return (
    <div role="alert">
      <p>오류가 발생했습니다:</p>
      <pre style={{ color: 'red' }}>{error.message}</pre>
      <button onClick={resetErrorBoundary}>다시 시도</button>
    </div>
  );
}

function App() {
  return (
    <ErrorBoundary
      FallbackComponent={ErrorFallback}
      onError={(error, info) => logError(error, info)}
      onReset={() => { /* 초기화 로직 */ }}
    >
      <Widget />
    </ErrorBoundary>
  );
}resetErrorBoundary를 호출하면 에러 경계의 hasError 상태가 초기화되고 자식을 다시 렌더링한다.
useErrorBoundary 훅
함수형 컴포넌트 내부에서 에러를 수동으로 에러 경계로 던질 수 있다:
import { useErrorBoundary } from 'react-error-boundary';

function DataFetcher() {
  const { showBoundary } = useErrorBoundary();

  useEffect(() => {
    fetchData().catch((error) => {
      showBoundary(error); // 비동기 에러를 에러 경계로 전파
    });
  }, []);

  return <div>데이터</div>;
}
이 방법으로 비동기 에러도 에러 경계에서 처리할 수 있다.
에러 경계 배치 전략
에러 경계를 어디에 두느냐에 따라 복구 범위가 달라진다:
function App() {
  return (
    <ErrorBoundary FallbackComponent={AppCrashPage}>
      {/* 전체 앱 보호 */}
      <Layout>
        <ErrorBoundary FallbackComponent={SidebarError}>
          <Sidebar />
        </ErrorBoundary>
        <ErrorBoundary FallbackComponent={ContentError}>
          <MainContent />
        </ErrorBoundary>
      </Layout>
    </ErrorBoundary>
  );
}- 전역 에러 경계: 최후의 안전망 (앱 전체 크래시 방지)
- 기능별 에러 경계: 독립 기능(사이드바, 위젯 등)을 개별 격리
- 데이터 페칭 경계: Suspense와 함께 사용 (다음 글에서 다룸)
이벤트 핸들러 에러 처리
이벤트 핸들러는 에러 경계가 잡지 못하므로 직접 try/catch를 사용한다:
function SubmitButton() {
  const [error, setError] = useState<Error | null>(null);

  async function handleClick() {
    try {
      await submitForm();
    } catch (e) {
      setError(e instanceof Error ? e : new Error('알 수 없는 오류'));
    }
  }

  if (error) return <p>제출 실패: {error.message}</p>;

  return <button onClick={handleClick}>제출</button>;
}
지난 글: React에서 애니메이션 구현하기
다음 글: 에러 경계 심화: 복구·리셋·에러 추적
읽어주셔서 감사합니다. 😊
PALDYN / ARTICLE AI
글의 개념, 수식, 코드에 대해 물어보세요.
질문과 관련된 문단을 골라 답변의 문맥으로 사용합니다.생각 중 · 0초