

TypeScript 에디터 환경 최적화 — VS Code 완전 설정
VS Code에서 TypeScript 개발 생산성을 극대화하는 설정을 안내합니다. 필수 확장 설치, settings.json 최적화, 단축키, 프로젝트별 TypeScript 버전 관리까지 다룹니다.
지난 글에서 TypeScript로 첫 번째 프로그램을 작성했다. 이제 더 효율적으로 TypeScript를 개발할 수 있도록 에디터 환경을 최적화한다. VS Code를 기준으로 설명하지만 WebStorm, Zed 등 다른 에디터에서도 핵심 개념은 동일하다.
VS Code와 TypeScript의 관계
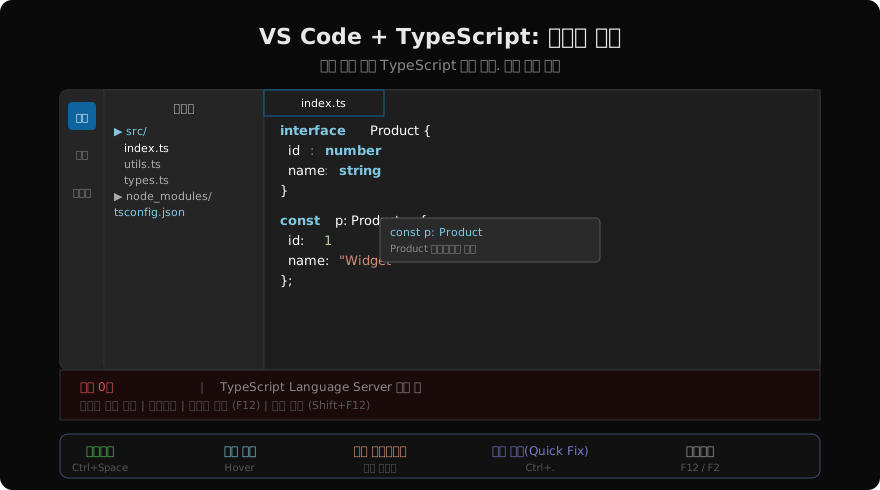
VS Code는 TypeScript로 작성된 에디터다. 그리고 TypeScript에 대한 최고 수준의 지원을 내장하고 있다. 별도 플러그인 없이도 다음 기능이 바로 된다.
- 실시간 타입 오류 강조 표시
- 자동완성 (IntelliSense)
- 호버 타입 정보
- Go to Definition (F12)
- Find References (Shift+F12)
- Symbol Rename (F2)
VS Code에는 자체 TypeScript 언어 서버(tsserver)가 내장되어 있다. 프로젝트에 TypeScript를 설치하지 않아도 기본적인 타입 검사가 된다. 하지만 프로젝트의 로컬 TypeScript 버전을 사용하는 것이 권장된다.
로컬 TypeScript 버전 사용
VS Code가 프로젝트에 설치된 TypeScript 버전을 쓰도록 설정한다.
Cmd+Shift+P(macOS) /Ctrl+Shift+P(Windows) →TypeScript: Select TypeScript Version검색Use Workspace Version선택
또는 .vscode/settings.json 에 직접 설정한다.
{
  "typescript.tsdk": "node_modules/typescript/lib"
}
이 설정을 프로젝트에 커밋해 두면 팀원 모두가 같은 TypeScript 버전으로 개발한다.
필수 확장 설치
ESLint
# 확장 ID: dbaeumer.vscode-eslint
# 터미널에서 설치
code --install-extension dbaeumer.vscode-eslint
ESLint는 TypeScript 코드의 품질을 강제한다. @typescript-eslint/eslint-plugin 과 함께 사용하면 TypeScript 전용 린트 규칙을 적용할 수 있다.
npm install --save-dev @typescript-eslint/eslint-plugin @typescript-eslint/parser eslinteslint.config.js:
import tsPlugin from '@typescript-eslint/eslint-plugin';
import tsParser from '@typescript-eslint/parser';

export default [
  {
    files: ['**/*.ts'],
    languageOptions: { parser: tsParser },
    plugins: { '@typescript-eslint': tsPlugin },
    rules: { ...tsPlugin.configs.recommended.rules },
  },
];
Prettier
코드 포맷팅을 자동화한다.
code --install-extension esbenp.prettier-vscode
npm install --save-dev prettier.prettierrc:
{
  "semi": true,
  "singleQuote": true,
  "tabWidth": 2,
  "trailingComma": "es5"
}
settings.json 최적화
VS Code의 사용자 설정(Cmd+Shift+P → Open User Settings JSON)에 다음을 추가한다.
{
  "editor.formatOnSave": true,
  "editor.defaultFormatter": "esbenp.prettier-vscode",
  "editor.codeActionsOnSave": {
    "source.fixAll.eslint": "explicit",
    "source.organizeImports": "explicit"
  },
  "typescript.updateImportsOnFileMove.enabled": "always",
  "typescript.inlayHints.parameterNames.enabled": "literals",
  "typescript.inlayHints.variableTypes.enabled": true
}
주요 설정 설명:
- formatOnSave — 저장 시 Prettier 자동 실행
- organizeImports — 저장 시 import 자동 정렬 및 미사용 import 제거
- updateImportsOnFileMove — 파일 이동 시 import 경로 자동 업데이트
- inlayHints — 추론된 타입을 코드 안에 인라인으로 표시
개발 워크플로
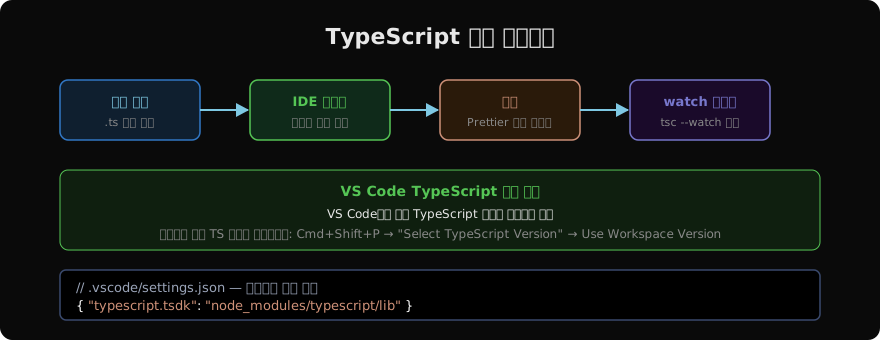
효율적인 TypeScript 개발 워크플로는 다음과 같다.
- VS Code에서
.ts파일 편집 - 실시간으로 타입 오류 확인 및 수정
- 파일 저장 → Prettier 자동 포매팅 + ESLint 자동 수정
- 터미널에서
tsc --watch로 백그라운드 컴파일 ts-node또는 컴파일된.js로 실행
유용한 단축키
| 단축키 (macOS) | 기능 |
|---|---|
F12 | 정의로 이동 (Go to Definition) |
Shift+F12 | 참조 찾기 (Find All References) |
F2 | 심벌 이름 변경 (Rename Symbol) |
Cmd+. | 빠른 수정 (Quick Fix) |
Ctrl+Space | 자동완성 수동 트리거 |
Shift+Alt+O | Import 정리 (Organize Imports) |
WebStorm / IntelliJ 사용자
WebStorm은 TypeScript를 기본 지원한다. TypeScript 언어 서비스가 내장되어 있어 별도 설정 없이 자동완성, 타입 검사, 리팩터링이 모두 동작한다. VS Code와 동등한 수준의 TypeScript 개발 경험을 제공한다.
환경 설정이 완료됐다. 다음 글부터는 TypeScript 타입 시스템의 핵심인 타입 공간과 값 공간의 구분부터 시작해 타입 시스템을 체계적으로 학습한다.
지난 글: TypeScript로 첫 번째 프로그램 작성하기
다음 글: 타입 공간과 값 공간 — TypeScript의 두 세계
읽어주셔서 감사합니다. 😊
PALDYN / ARTICLE AI
글의 개념, 수식, 코드에 대해 물어보세요.
질문과 관련된 문단을 골라 답변의 문맥으로 사용합니다.생각 중 · 0초